 Deutsch
 English
Manual for the RyngDyng App
Version 2.0
The manual for the previous version 1.0 (until 08/2022) is available here . The previous version 1.0 has got a light colored header.
Functions of the RyngDyng App:
- Establishes a connnection to the RyngDyng systems via the local RyngDyng WiFi network (wireless LAN)
- Calibration of targets and target faces
- Management of all user data and assignment of users to targets
- Starting and stopping arrow detection
- Live view of all hits
- Data analysis of stored data on hits
- Support for bow tuning such as with bare shaft testing, walk-back testing or grouping tests
- Synchronization of all data with your personal account in the Archery Analytics cloud
- Administration of RyngDyng systems (shutdown, prameter settings, software updates, ...)
Not all of these features are available in all versions. It depends on the user's permissions which functions are enabled. For example, spectators can use the RyngDyng App to watch a tournament live. However, they cannot control the system. Archers with an Archery Analytics account can use the RyngDyng App to evaluate their personal saved hits and carry out tuning tests.
RyngDyng App supports multiple languages. Currently we support English, German, Italian, French and Korean. On request - and with a little help - we can add mor languages, if required.
The RyngDyng app is a so-called Progressive Web App . Such apps essentially consist of web pages, but they also work without being connected to the Internet or a local network. To do this, these apps install themselves in the browser of the terminal device and retain all the necessary data even after they are closed. The advantage of progressive web apps is that they can be run on any terminal device with a suitable browser, just like other websites: Android devices, iPhones, tablets, Microsoft PCs, etc. At the same time, they behave like installed apps without having to download them from an app store. Simply call up the link to the app in your browser and you're good to go. Here is the link to the RyngDyng App , QR code below:
The app can be saved as an icon on the start screen. With many operating systems such as Android and modern browsers such as Chrome or Edge, this can be done by clicking on the blue install button that is displayed in the header when the app is called up for the first time:
Unfortunately, some browsers such as Safari for iOS or Firefox on Windows PC do not support this button. In Safari, the app should definitely be added to the home screen as an icon (for instructions see e.g. adding bookmarks).
Requirement: The WiFi router is switched on and ready for operation, i.e. the orange LED lights up or flashes permanently. After the router is operational, RyngDyng is switched on and is also operational after about 1 minute.
In order to connect to an operational RyngDyng, you connect your terminal device (mobile phone, tablet, ...) to the WiFi with the name (SSID) RyngDyng. The password will be delivered together with the WiFi router, or it will be provided by the organizer / owner of the RyngDyng system.
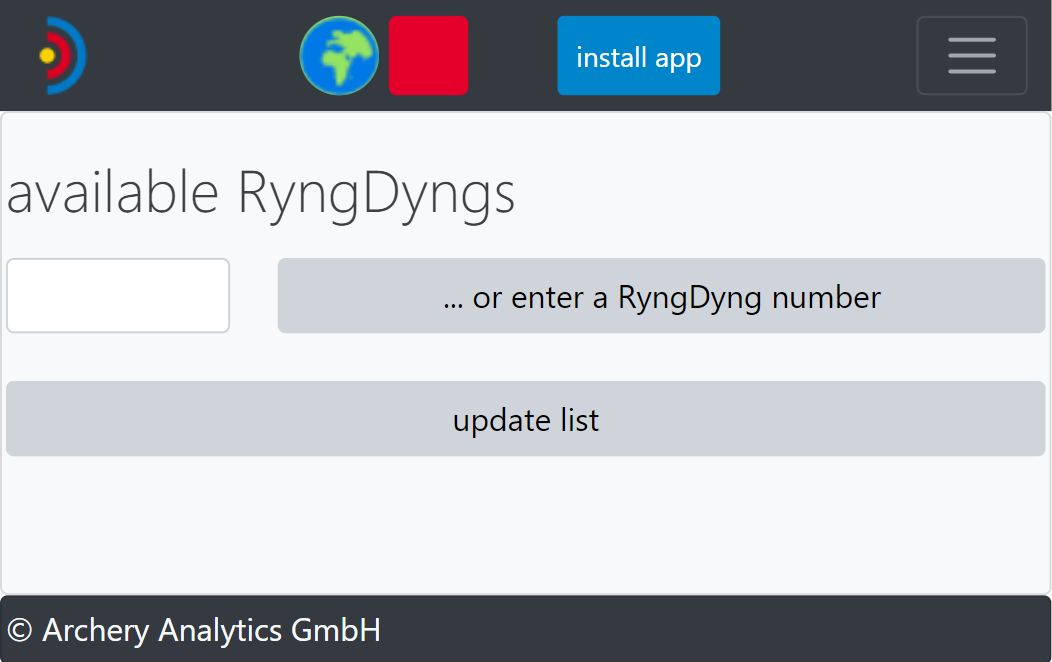
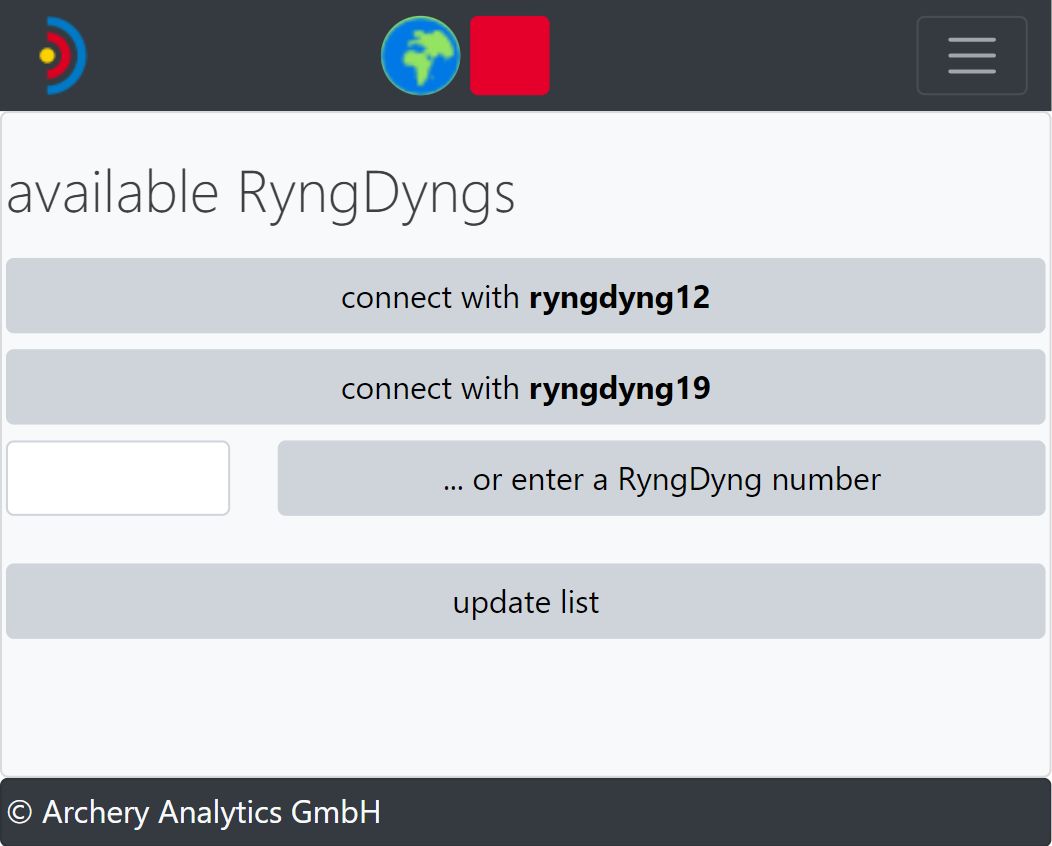
Then go to page RyngDyng in the app. If RyngDyng systems are already connected to the WiFi, they will be listed and a button for connecting will appear (left image). If these are not displayed, you can use the update list button to find them.
Alternatively, you can also enter a known RyngDyng number and connect directly - as long as this RyngDyng is operational and accessible in the WiFi.
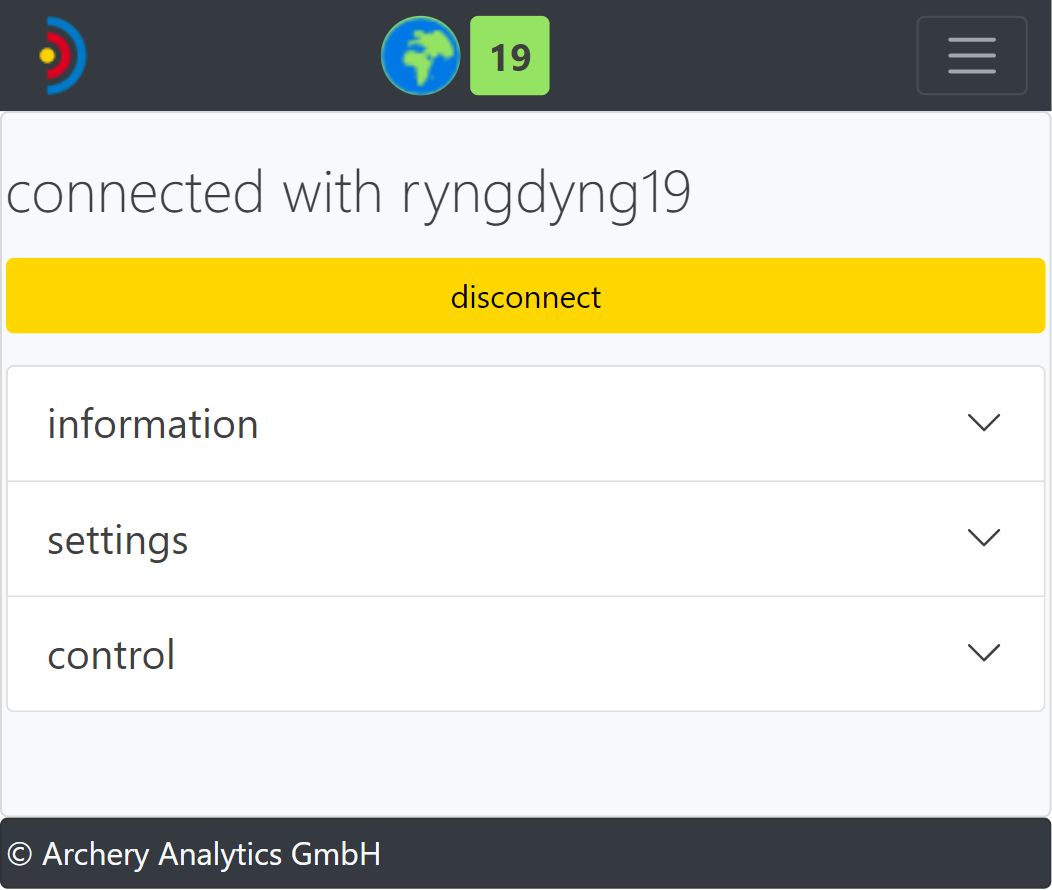
After successfully connecting to a RyngDyng, the connection indicator at the top turns green and a status message appears (right image)
If the WiFi router is also connected to the Internet, this is indicated by the blue-green globe in the header. Instructions for establishing this internet connection can be found
here
When the connection is established, some status information about the connected RyngDyng is displayed under information:
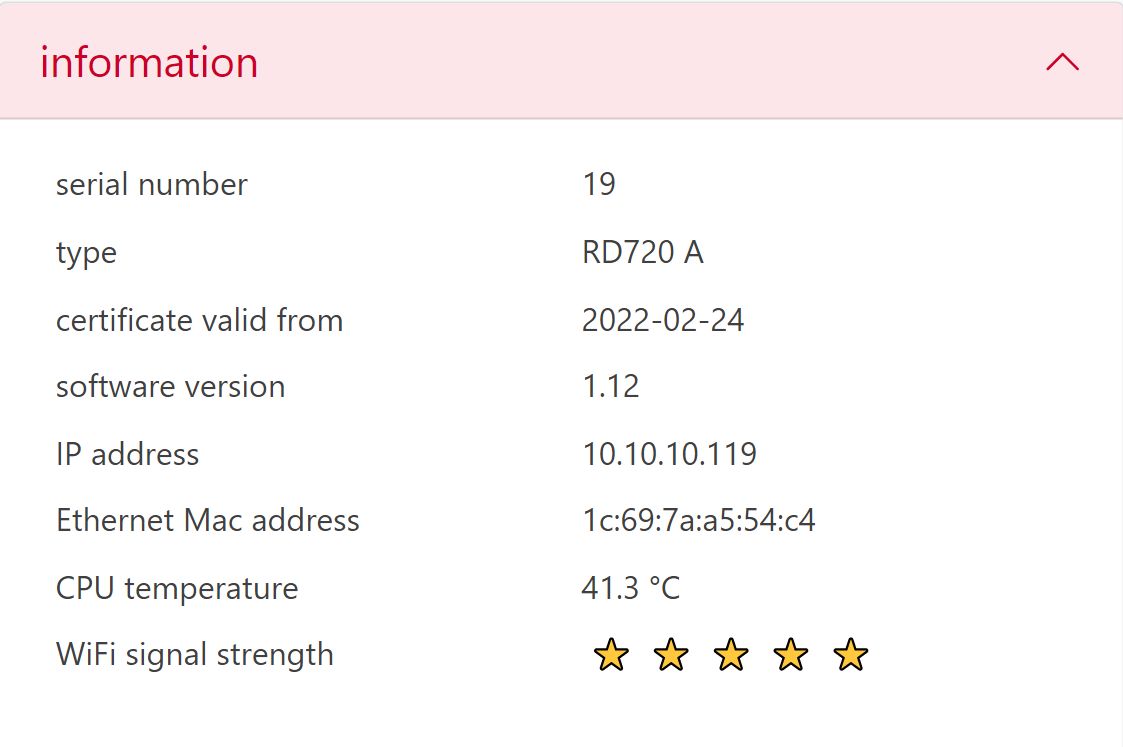
It is important that the WiFi signal strength for RyngDyng is sufficient, i.e. at least 3 stars. This signal strength depends on the distance between the router and RyngDyng (max. 20 m).
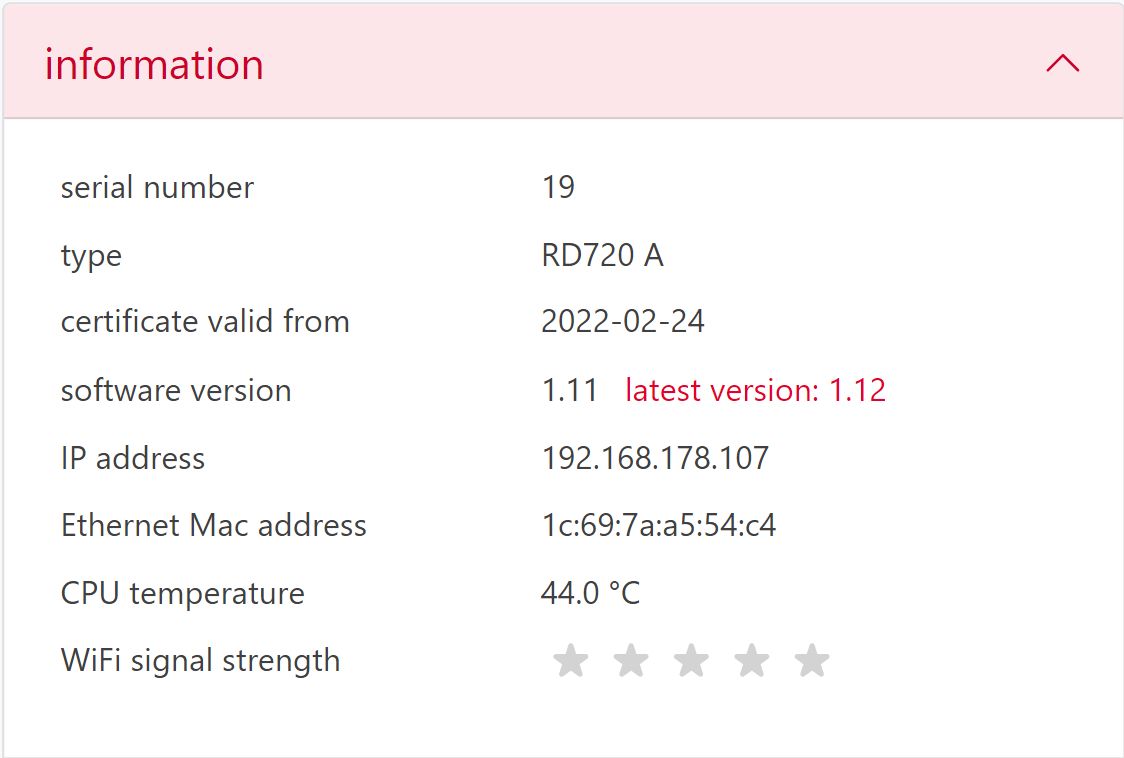
If a new software version is available for RyngDyng, this is also displayed (picture on the right). In this case, the router should be connected to the Internet so that RyngDyng can automatically obtain the new software when it restarts.
With an existing connection to RyngDyng, the settings section appears on the RyngDyng page:
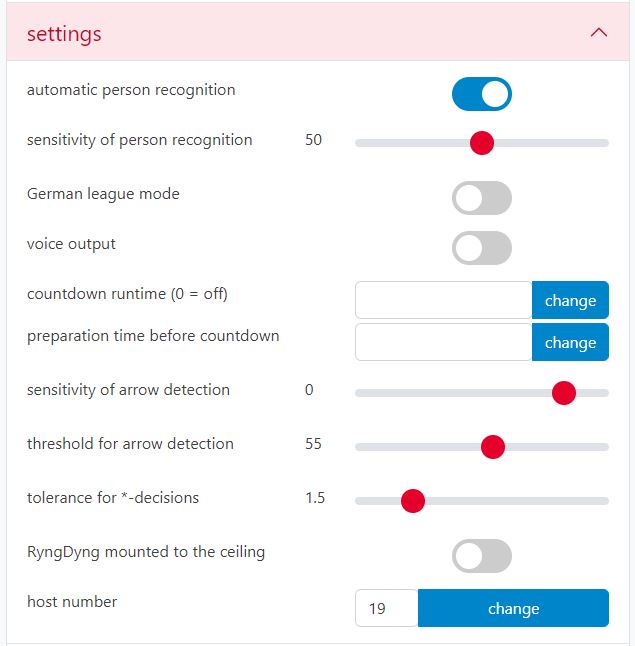
Automatic person recognition: If this function is activated, RyngDyng automatically recognizes people when pulling the arrows and pauses the arrow detection. If no more people can be seen in the picture, the arrow detection is started again and a new end is started. Without automatic person recognition, the arrow detection should be stopped and started at the push of a button, e.g. in tournaments.
Sensitivity of person recognition: (only visible for RyngDyng admins) The higher the value, the more sensitive the person detection. The default value is 50. If the observed target is small or if RyngDyng is mounted on the ceiling, a higher value can help to improve person detection. If the value is too high and RyngDyng spontaneously goes into pause mode, a lower value can solve the problem.
German league mode: This function ensures that two 3-spots next to each other are given the letters A and B and that all 6 spots can be displayed as an overlay in the live view.
Voice output: If this function has been activated, a speech output for all detected hits will be generated. The number of points as well as the position as an hour on the clock will be announced. Furthermore, all changes in state such as 'arrow detection active/paused' will be reported verbally.
Countdown runtime: If this value is > 0, a countdown is activated when arrow detection is started and the current time is displayed on the Hits page. After the countdown has expired, the arrow detection is stopped automatically. This allows a competition to be simulated.
Preparation time before countdown: Number of seconds before the countdown that is available as preparation time. This time is also displayed on page Hits after start of arrow detection page.
Sensitivity of arrow detection: Decreasing this value to e.g. -5 or -10 makes arrow detection less sensitive. This can be helpful when wind moves the target face and arrow detection is affected. Conversely, arrow detection becomes more sensitive as the value increases.
Threshold for arrow detection: (only visible for RyngDyng admins) The lower this value, the better RyngDyng detects dark arrows in darker surroundings. Should RyngDyng also recognize arrows in front of a dark background, this value should be reduced. If RyngDyng does not recognize some arrows, reducing this value to e.g. 40 can help. (Note: this feature is only available from RyngDyng version 1.2).
Tolerance for *-decisions: It is common in tournaments that arrows in close proximity to a higher score are first marked with a *. This * means: "Can possibly be upgraded by the judge". The value for the *-tolerance determines at what distance from the ring border this * mark is made. A value of 0 turns this feature off.
RyngDyng mounted to the ceiling: (only visible for RyngDyng admins) The RD720 supports ceiling mounting, the RD600 can be upgraded for this. If this switch is activated, all images from the cameras will be transformed accordingly after the next restart.
Host number: (only visible for RyngDyng admins) By default, the host number is equal to the serial number of the RyngDyng. You can change the host number here, e.g. set it equal to the target number. Then, after a restart, RyngDyng will appear in the network under this changed number. Important: All RyngDyng within the same network must have different host numbers.
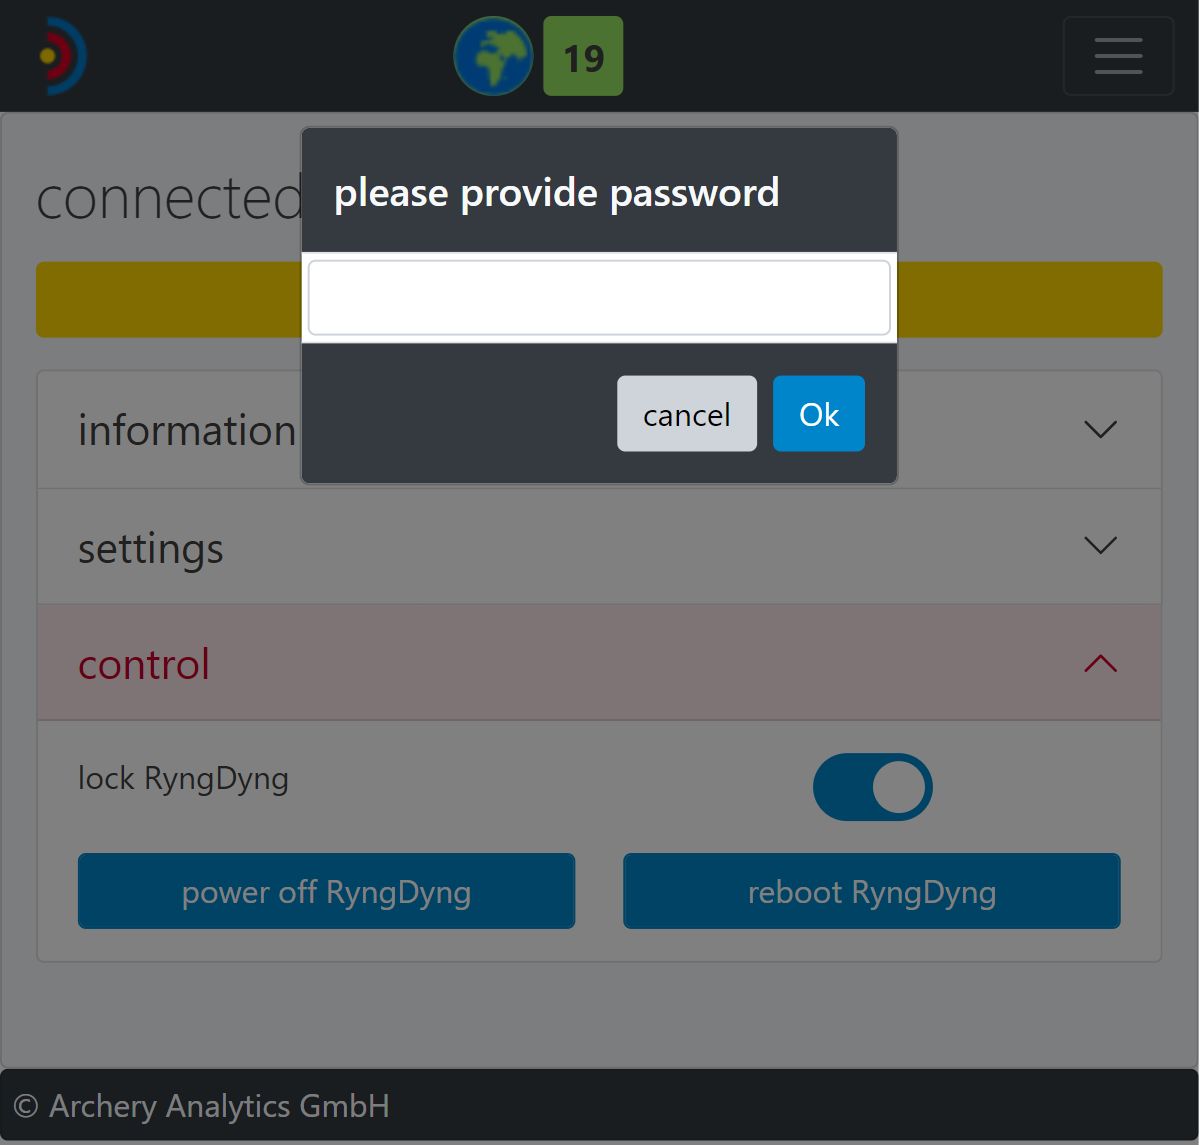
The commands for locking, switching off and restarting RyngDyng can be found under the heading control:
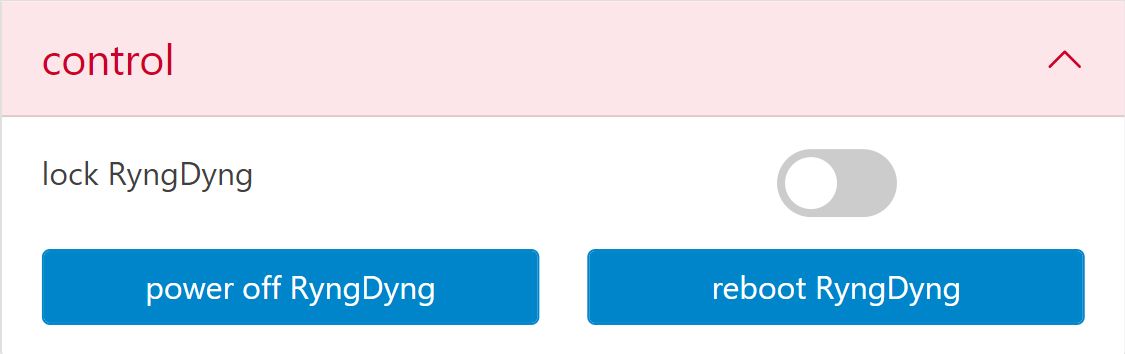
If RyngDyng is locked, a password is requested (see next picture). After entering the password, only apps that have stored the same password can send control commands to RyngDyng. This allows RyngDyng to be protected against unauthorized access during a tournament.
Power off RyngDyng: RyngDyng should always be shut down cleanly using this function, never just disconnect from the power supply! All computers can be damaged if the power is suddenly cut off instead of shutting down cleanly.
Reboot RyngDyng: This function is rarely required, e.g. after activating ceiling mounting or when new software is to be obtained.
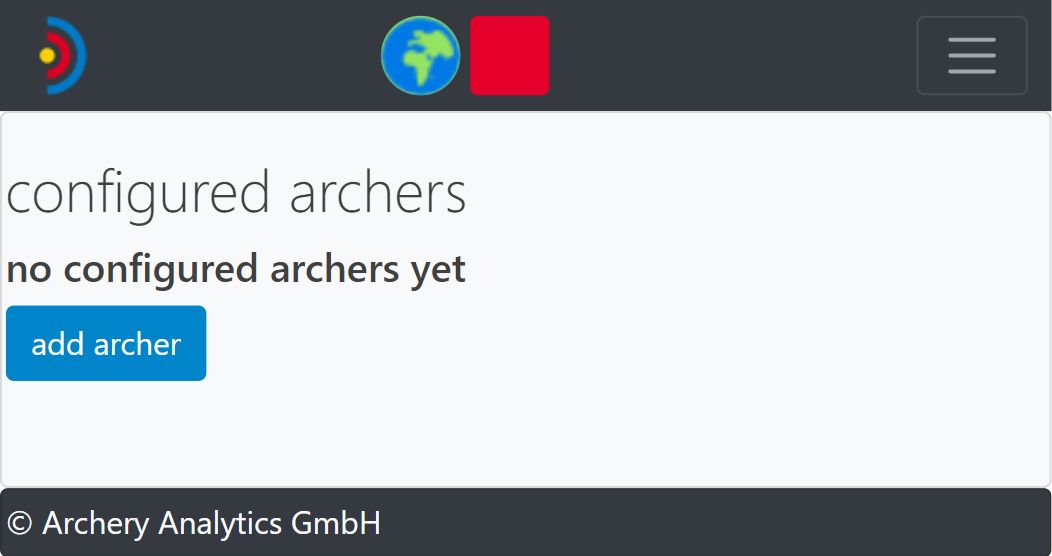
In order to use the full range of functions of the RyngDyng app, archers must be added. Settings can then be stored for these archers and recorded arrows are assigned to the created archers.
An internet connection is required to add archers. Since the RyngDyng WiFi usually has no connection to the Internet, it is better to carry out this step without a connection to the RyngDyng.
With a newly installed RyngDyng app without already created archers, you will initially only find a button for adding a person on page archers.
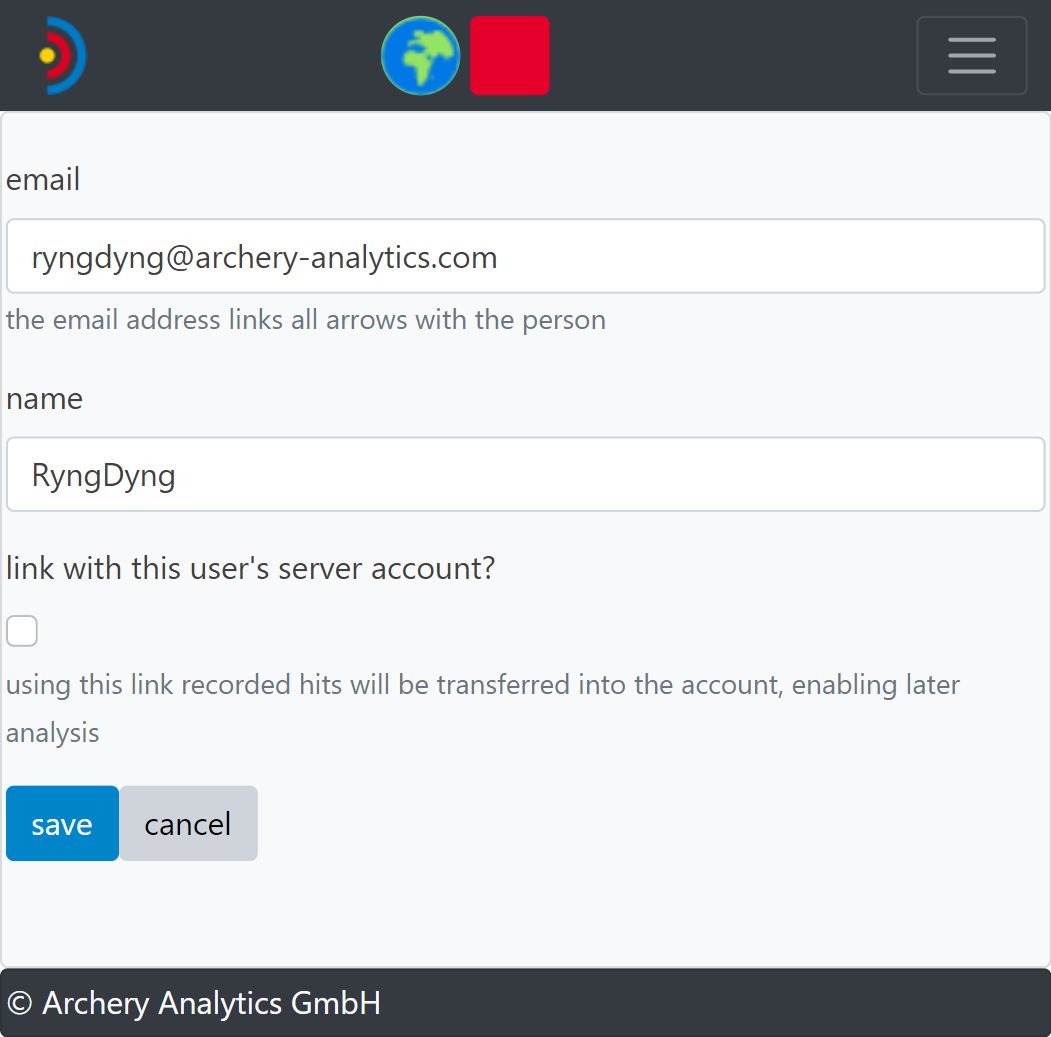
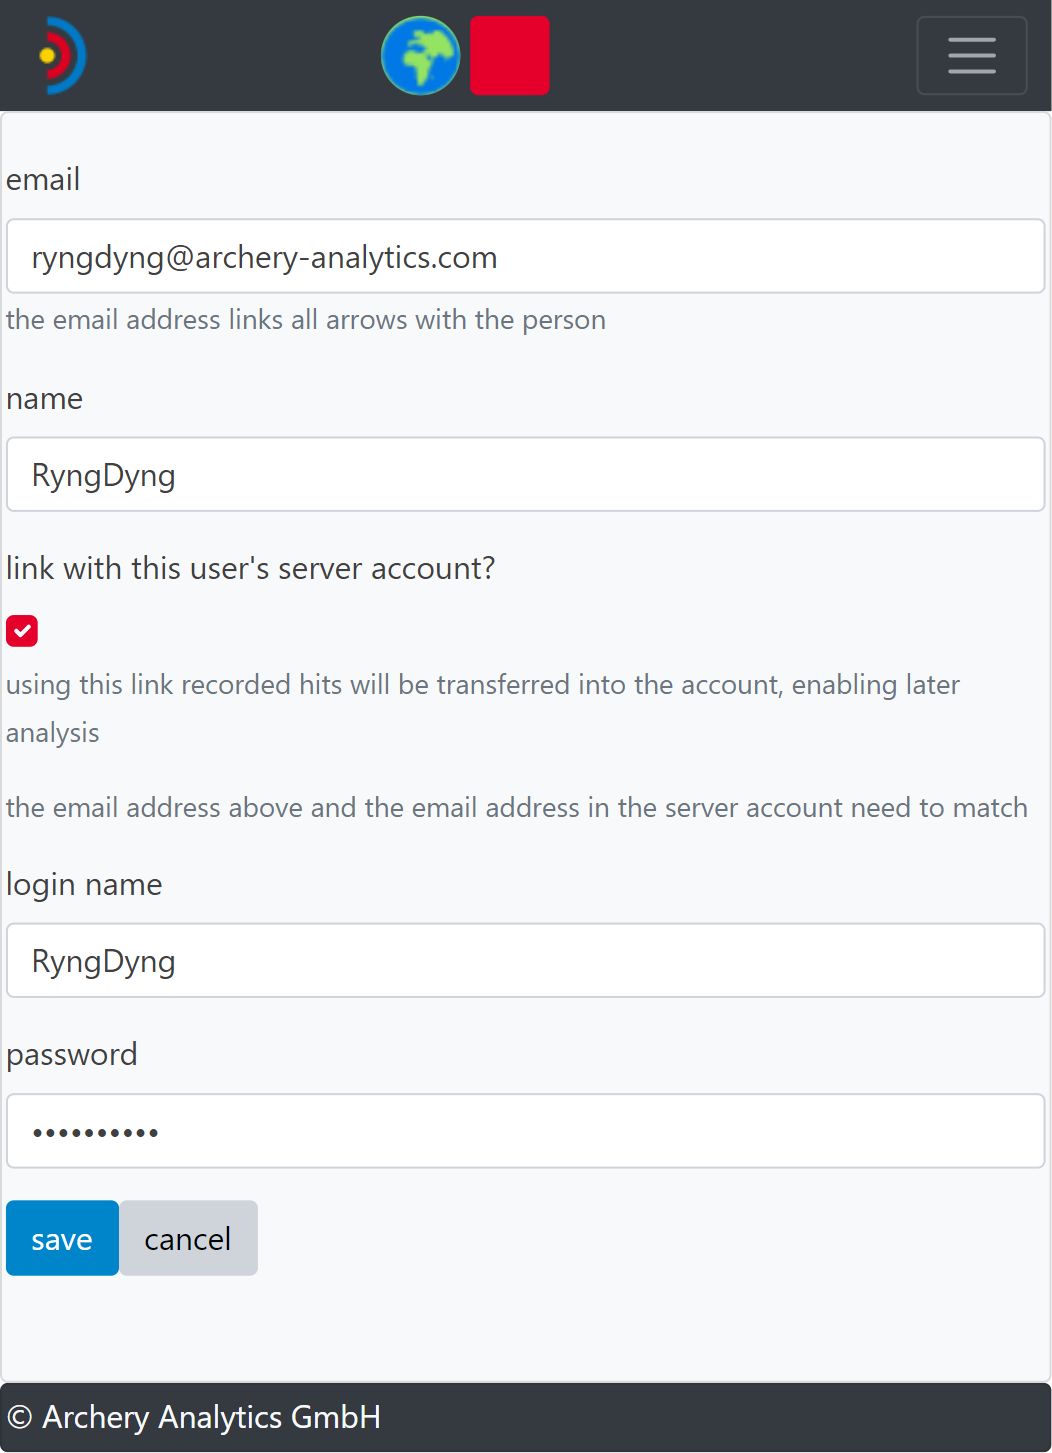
After pressing the add archer button, the left mask appears. If this person already has an account on Archery Analytics' server, you can also enter the access data for the account (right image). This will connect the app to the server account and all detected arrows will be transferred to the server. More details are described in the document
Manual for Registration and Activation
.
If several archers have been created, they are displayed as a list. An icon behind the name indicates that this person has been linked to the server account. By clicking on the pen symbol, the stored data can be edited or the person can be deleted again. If there is a connection to a RyngDyng, further information is displayed (right image). Clicking on the gear icon takes you to the settings for this person (see below under the heading "Configurations")

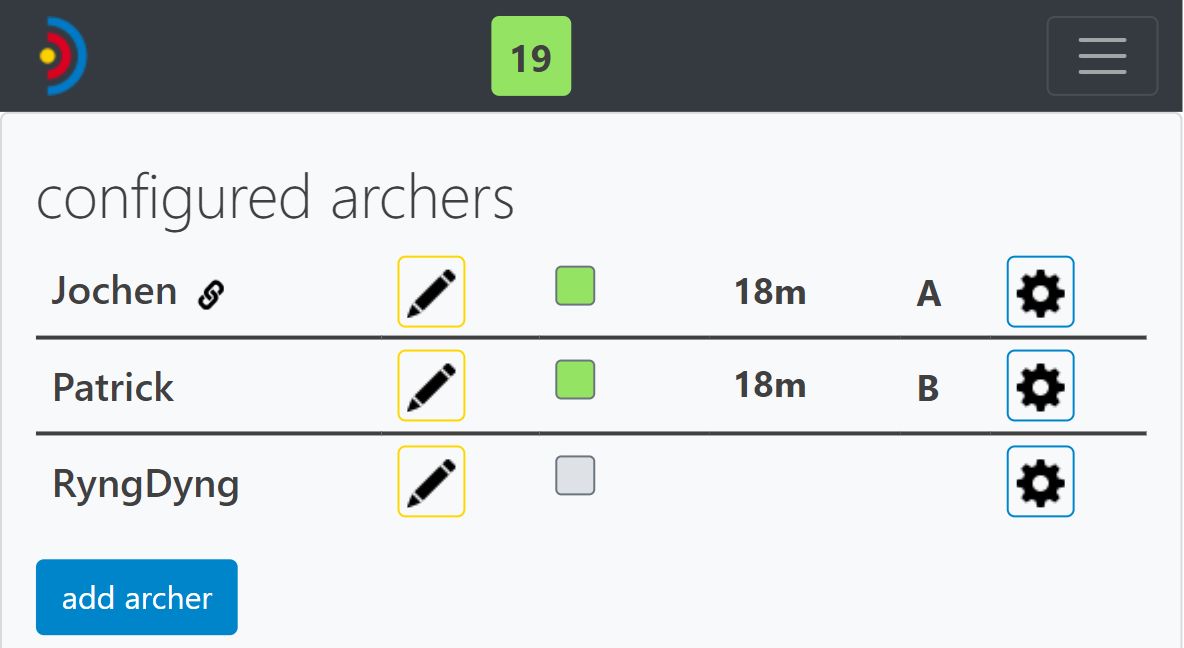
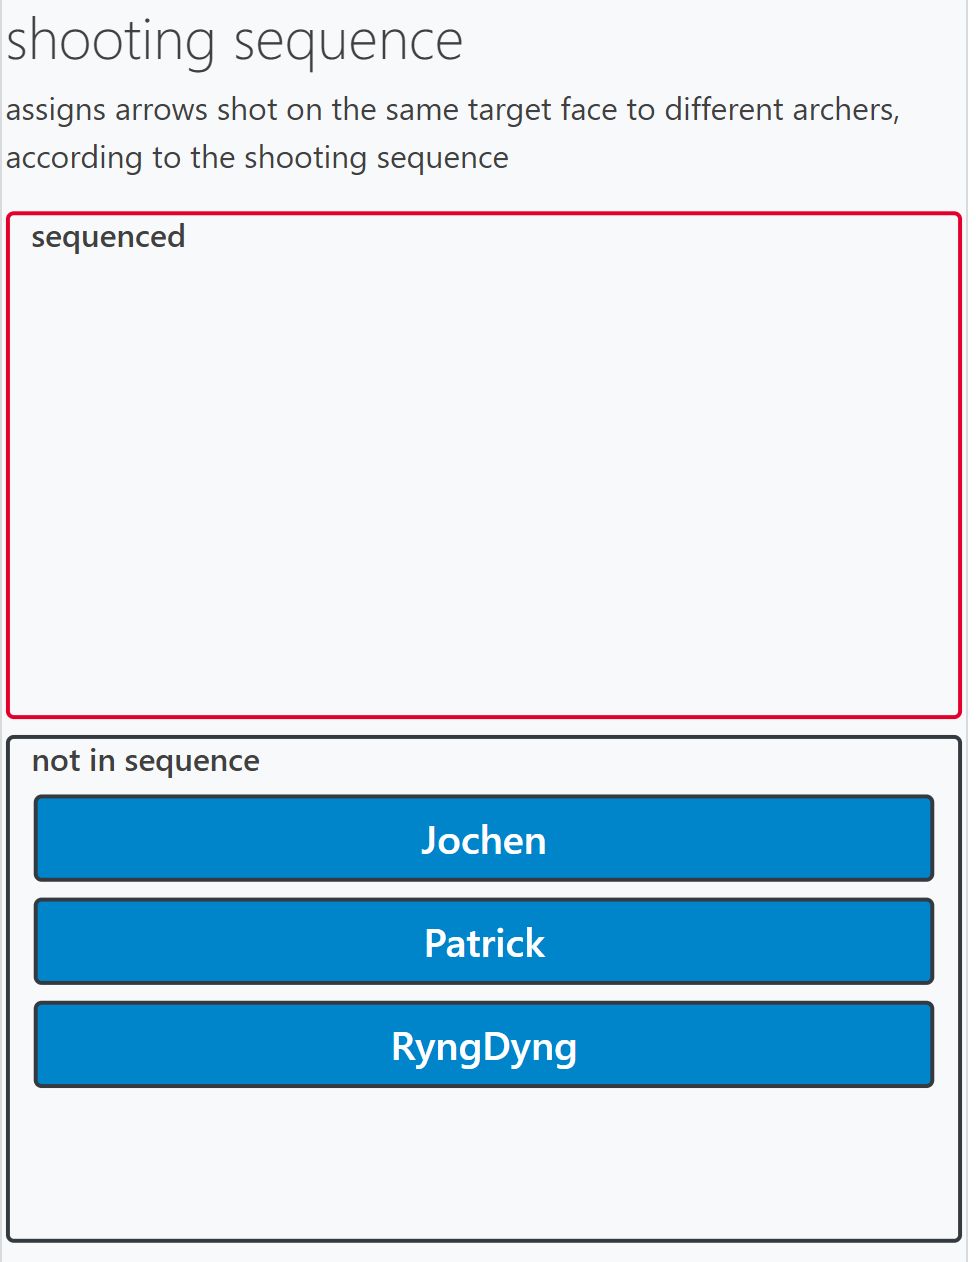
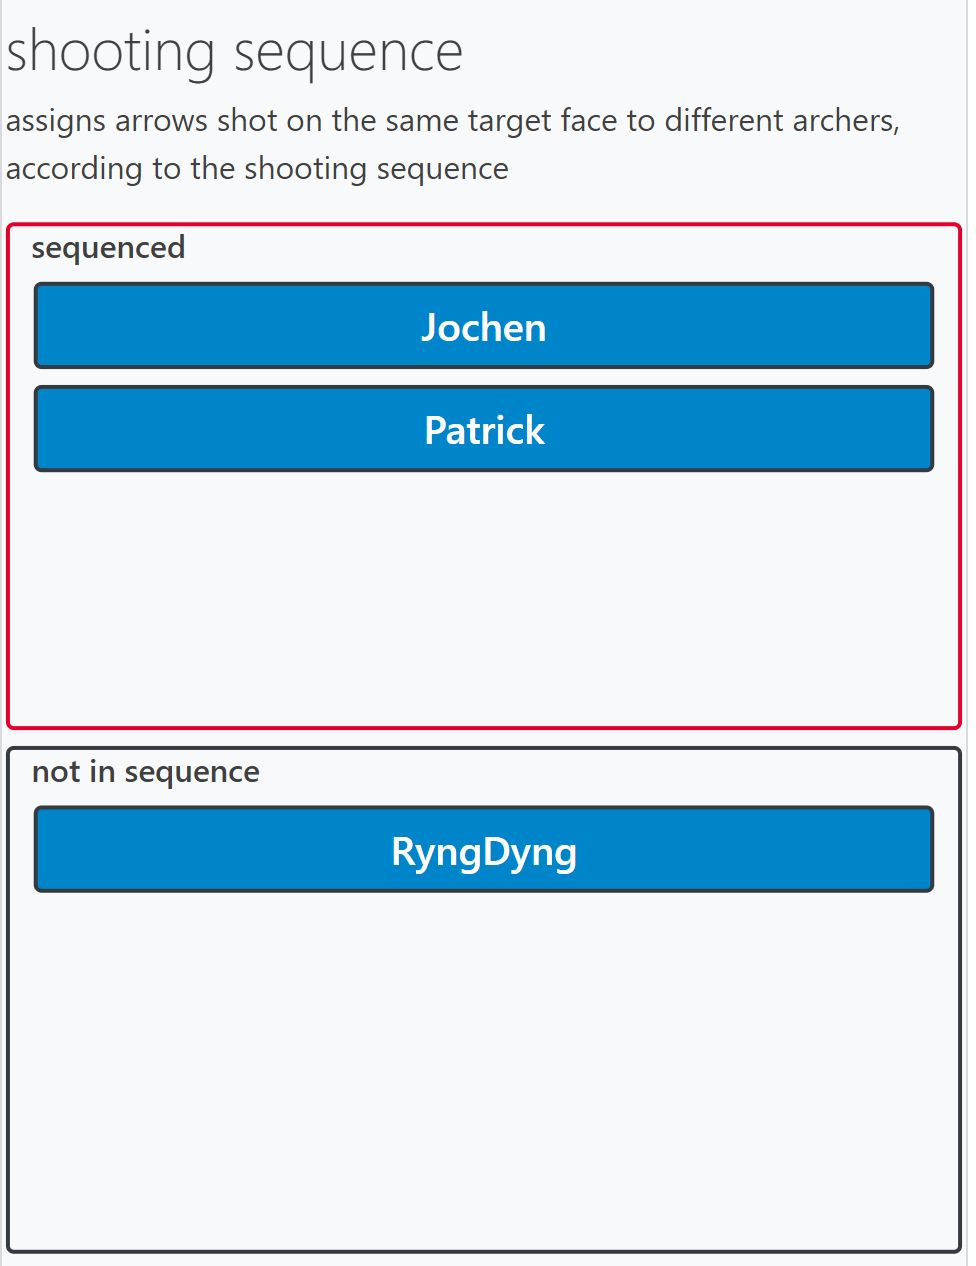
If there is a connection to a RyngDyng and several archers have been created, a shooting sequence can optionally be defined. This is helpful if several archers share a target face and the arrows should still be assigned separately to the individual archers. Arriving arrows are then assigned in turn according to the defined shooting sequence and can thus later be evaluated separately by archer.
To set the shooting sequence, drag the blue rectangles with the names of the people up into the 'sequenced' field. The order can easily be changed by moving.
The RyngDyng app offers extensive options for configuring the material used and the settings. Each detected arrow is linked to the settings valid at that time. When evaluating later in the RyngDyng app or in the Archery Analytics Cloud, you can call up the stored settings for each end.
You can get to the settings by clicking on the archer's gear icon. When connected to a RyngDyng, this can be done either on the archers page (left image) or on the hits page at the bottom (right image).

First of all, the most important setting is the selection of the face(s) you want to shoot at and the distance. Optionally, notes can be stored as text, which will also be available during the analysis. The indication of the direction of the compass (shooting direction) makes it possible to calculate the direction from which the sun came for each end. This direction of the sun will then be displayed at each end in the analysis.
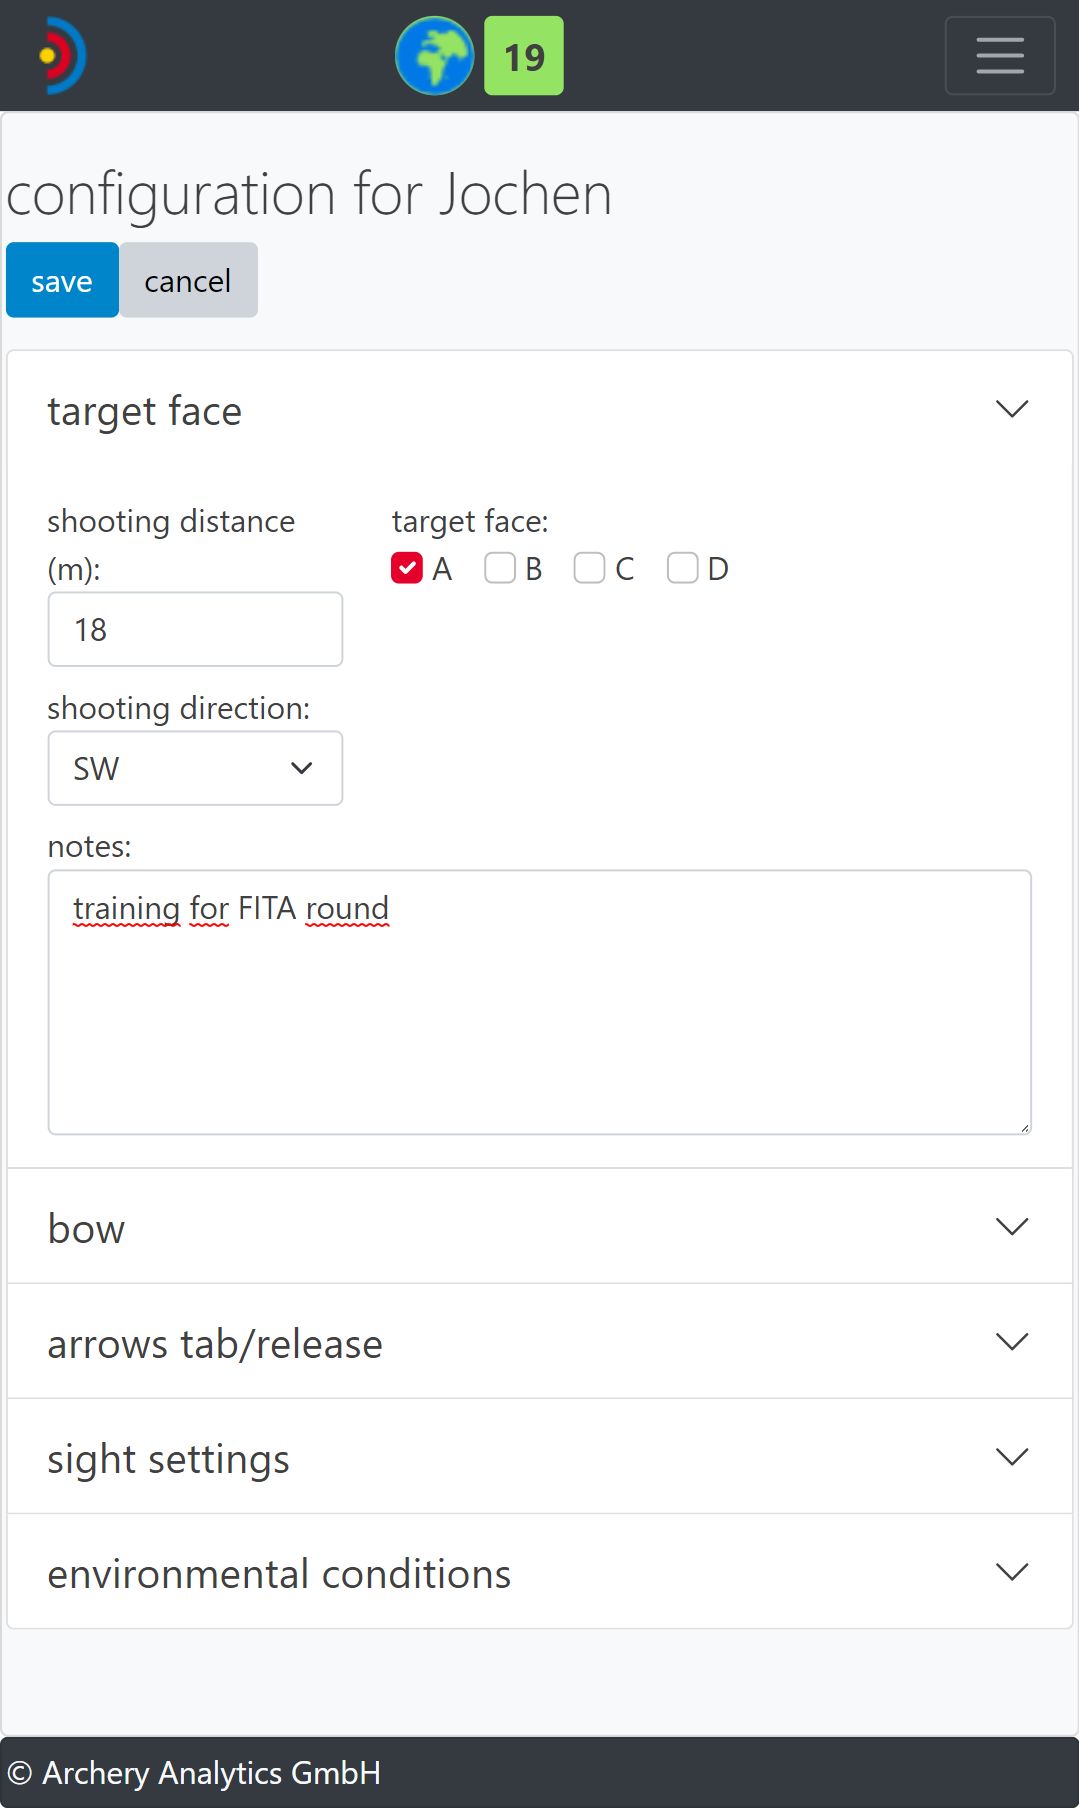
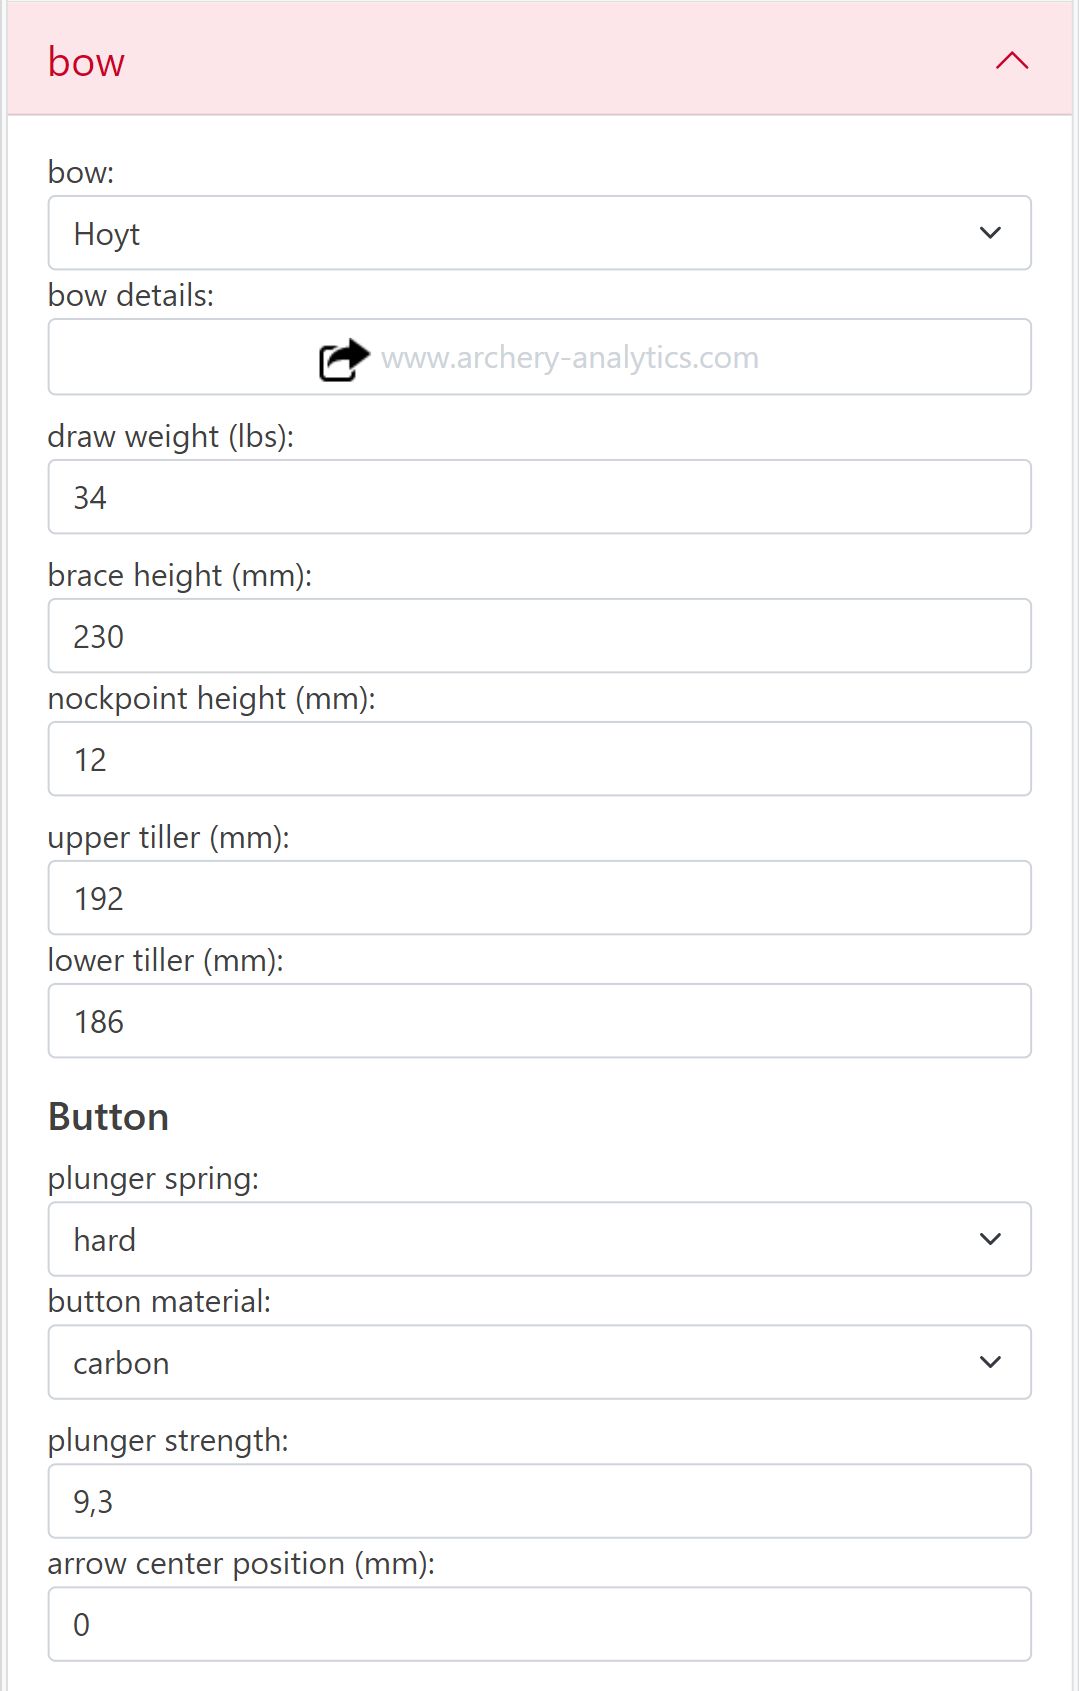
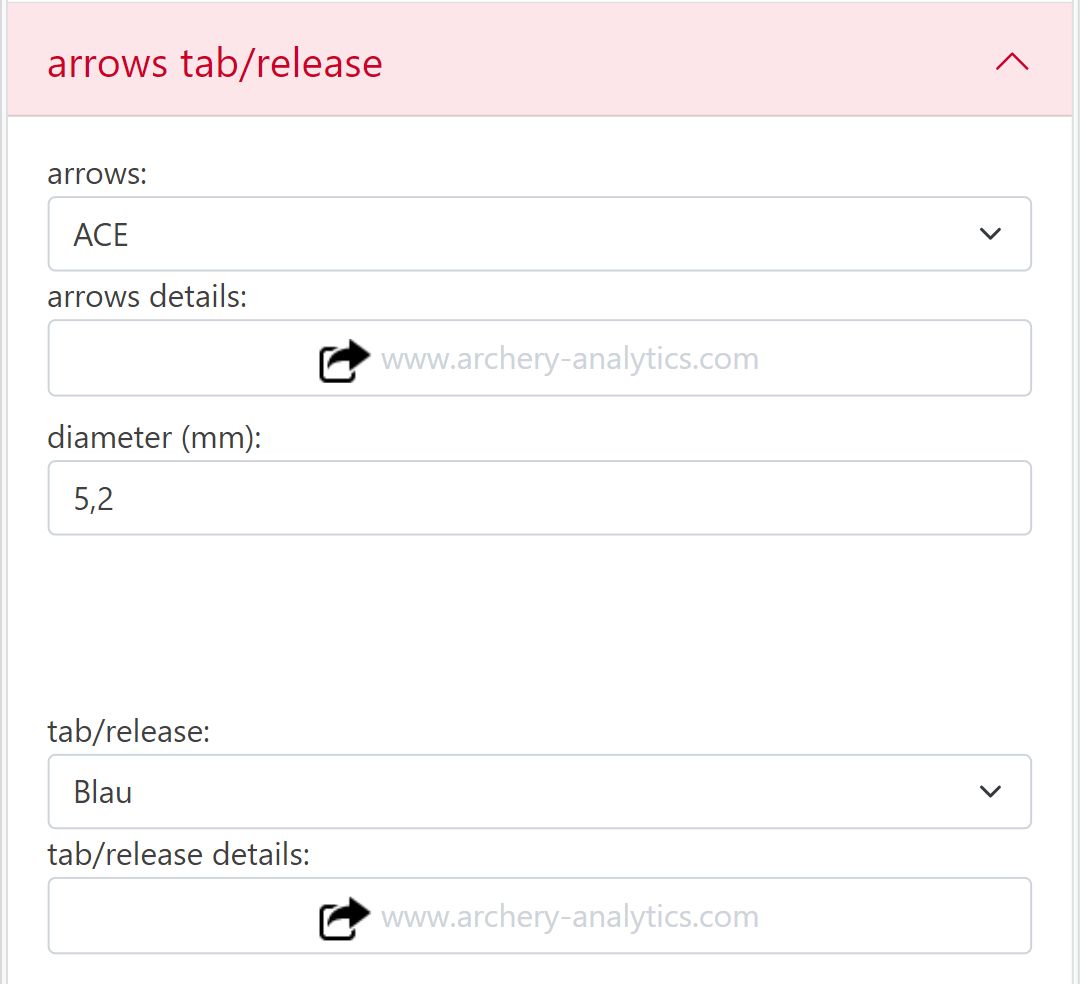
To select the material used, the arches, arrows and tabs/releases should first be created here on the server (e.g. under
my bows
). The material can then be selected in the app using the drop-down menu (see selection bow on the left in the image, arrows and tab/release on the right). In general, only those parameters for the bows that can also be changed on site are entered in the app. Unchangeable characteristics are stored in the server.
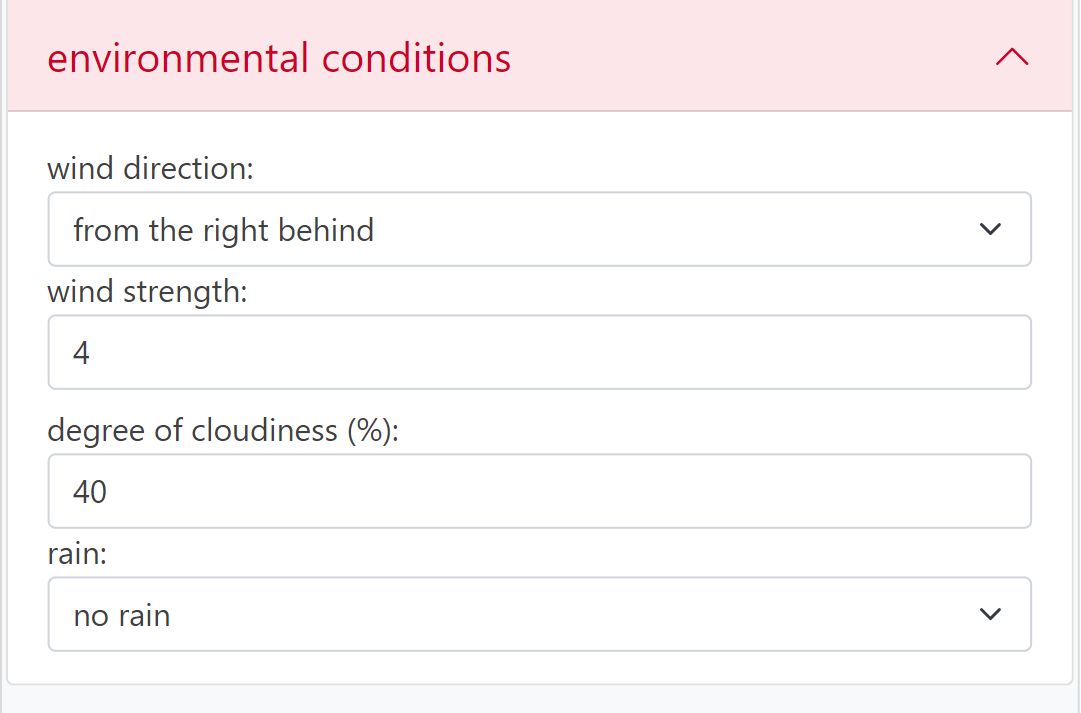
Sight settings and environmental conditions are other headings for important parameters that can be configured.
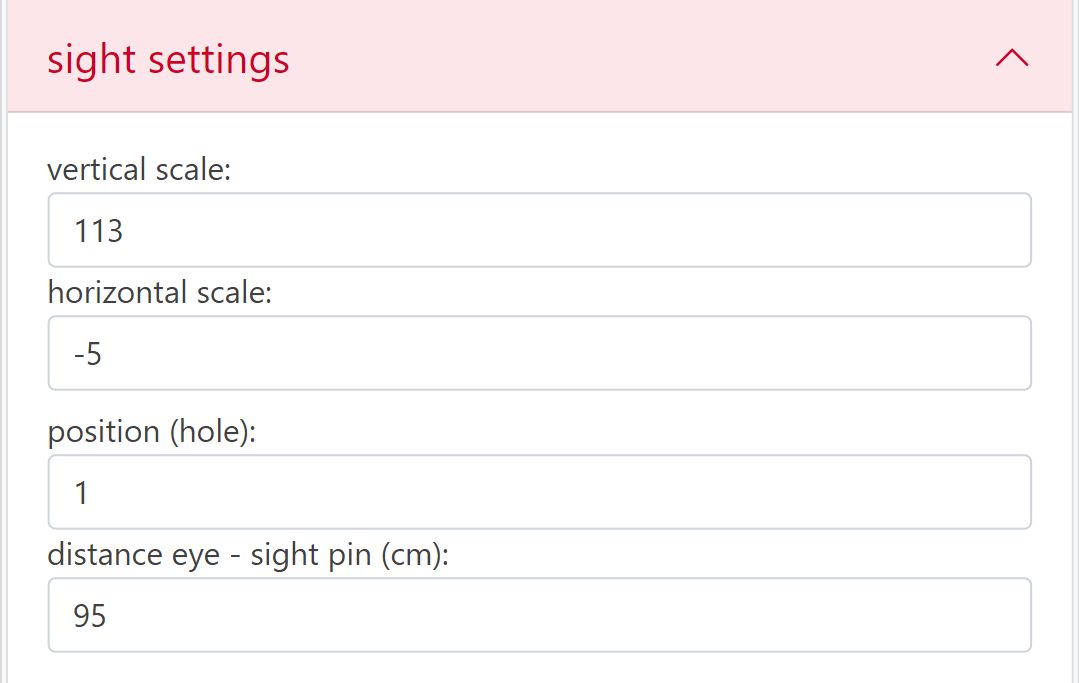
For each displayed end or overlay of ends, tips for sight adjustment can also be called up on the hits page (except for bare bows). In order for this to be possible, some information must be available. The features of the sight should be stored on the server (thread of the sight screws and number of clicks per revolution), and the current distance between the eye and the front sight should be entered in the app. Then the app can calculate how many clicks the sight screws should be adjusted horizontally and vertically to get the arrow group into the center of the target.
The RyngDyng app includes all functions for setting up and calibrating RyngDyng.
The first step is to point the RyngDyng cameras to the target. For this purpose, test images can be called up with the buttons left, middle and right. The sequence of images supports the alignment of the RyngDyng case by automatically retrieving images every 2 seconds. The red cross hairs should be aimed roughly at the center of the target. If the distance to the target is correct (3 m between the front edge of the RyngDyng case and the base of the center of the target), the image will be sharp and the chessboard squares will be approximately within the green markings.
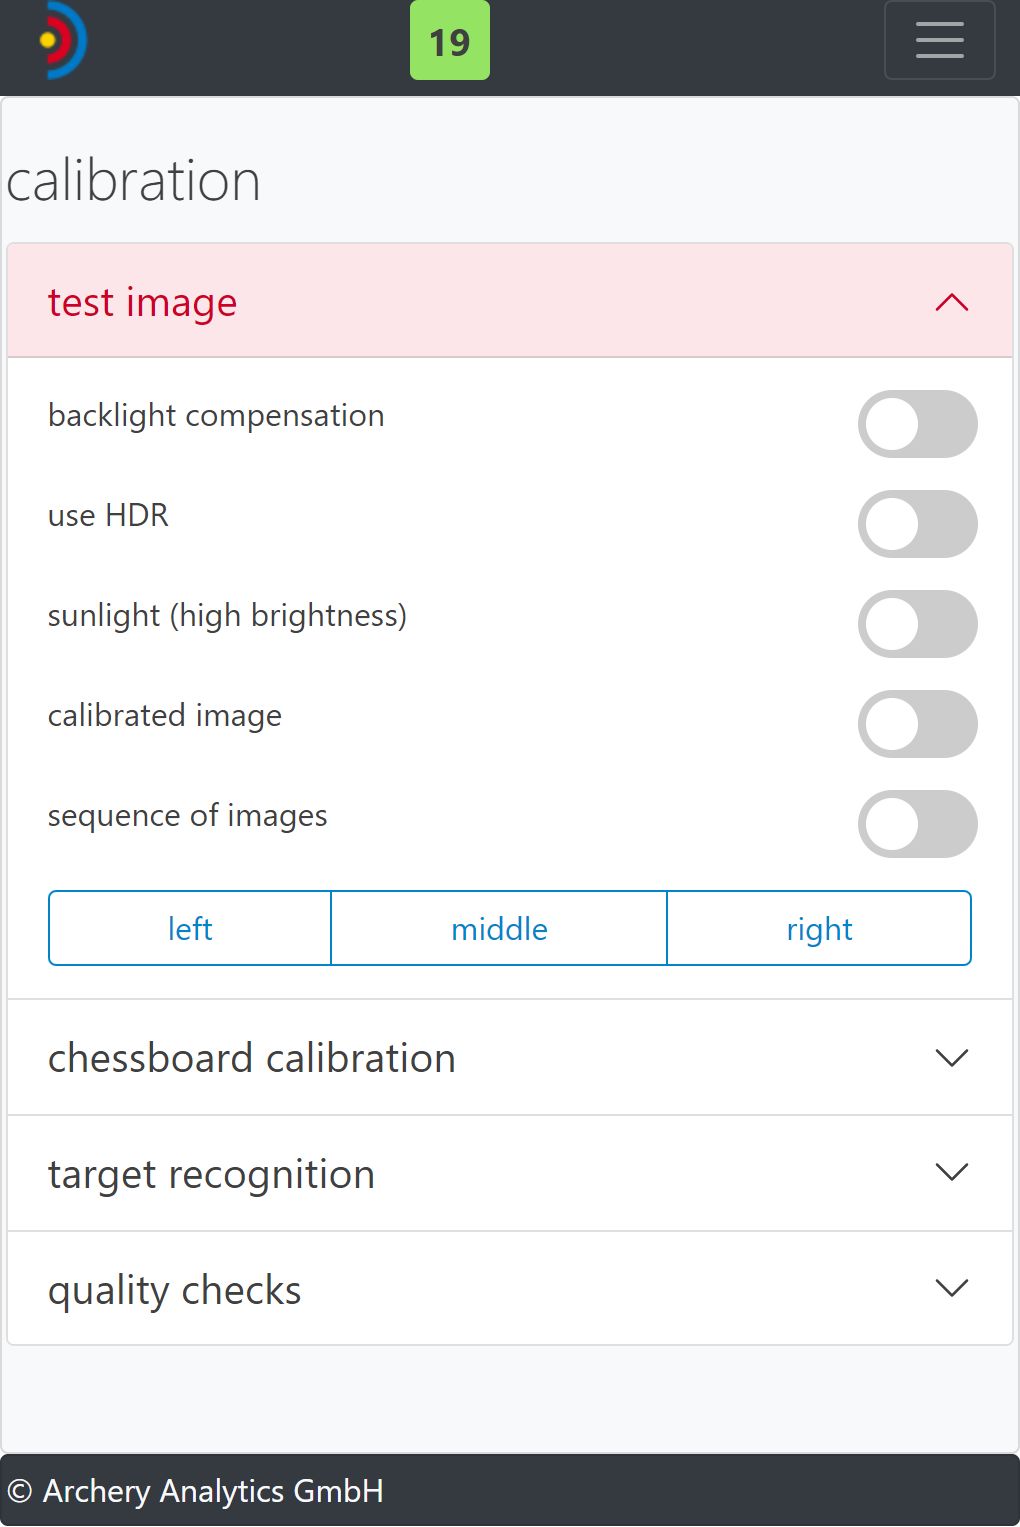

The switches for backlight compensation, sunlight etc. are used to improve the quality of the picture in difficult lighting conditions. However, these are rarely needed. It is usually sufficient to insert the ND filters in the cameras and use the lens hoods in full sunlight.
After you have aligned RyngDyng correctly, you can continue with the chessboard calibration. This calibration process determines the geometric position of RyngDyng in relation to the target and is the basis for the optical measurement of the arrow positions. After the chessboard calibration, the position of the RyngDyng in relation to the target must not be changed!
Execution: Fix the chessboard strips in the middle of the target with ordinary target nails. The upper strip should be attached as horizontally as possible. The cords to the lower chessboard strip should run as vertically as possible. The chessboard strips should lie exactly in the plane of the disc, as should the target faces attached later (i.e. not protruding or curved).
Then you select the appropriate size of the target and press the run chessboard calibration button. After a few seconds the calibration process is complete and the result is displayed for you to check. The process was successful if the chessboards form a square on all three cameras and the image view shows a central front-center perspective.
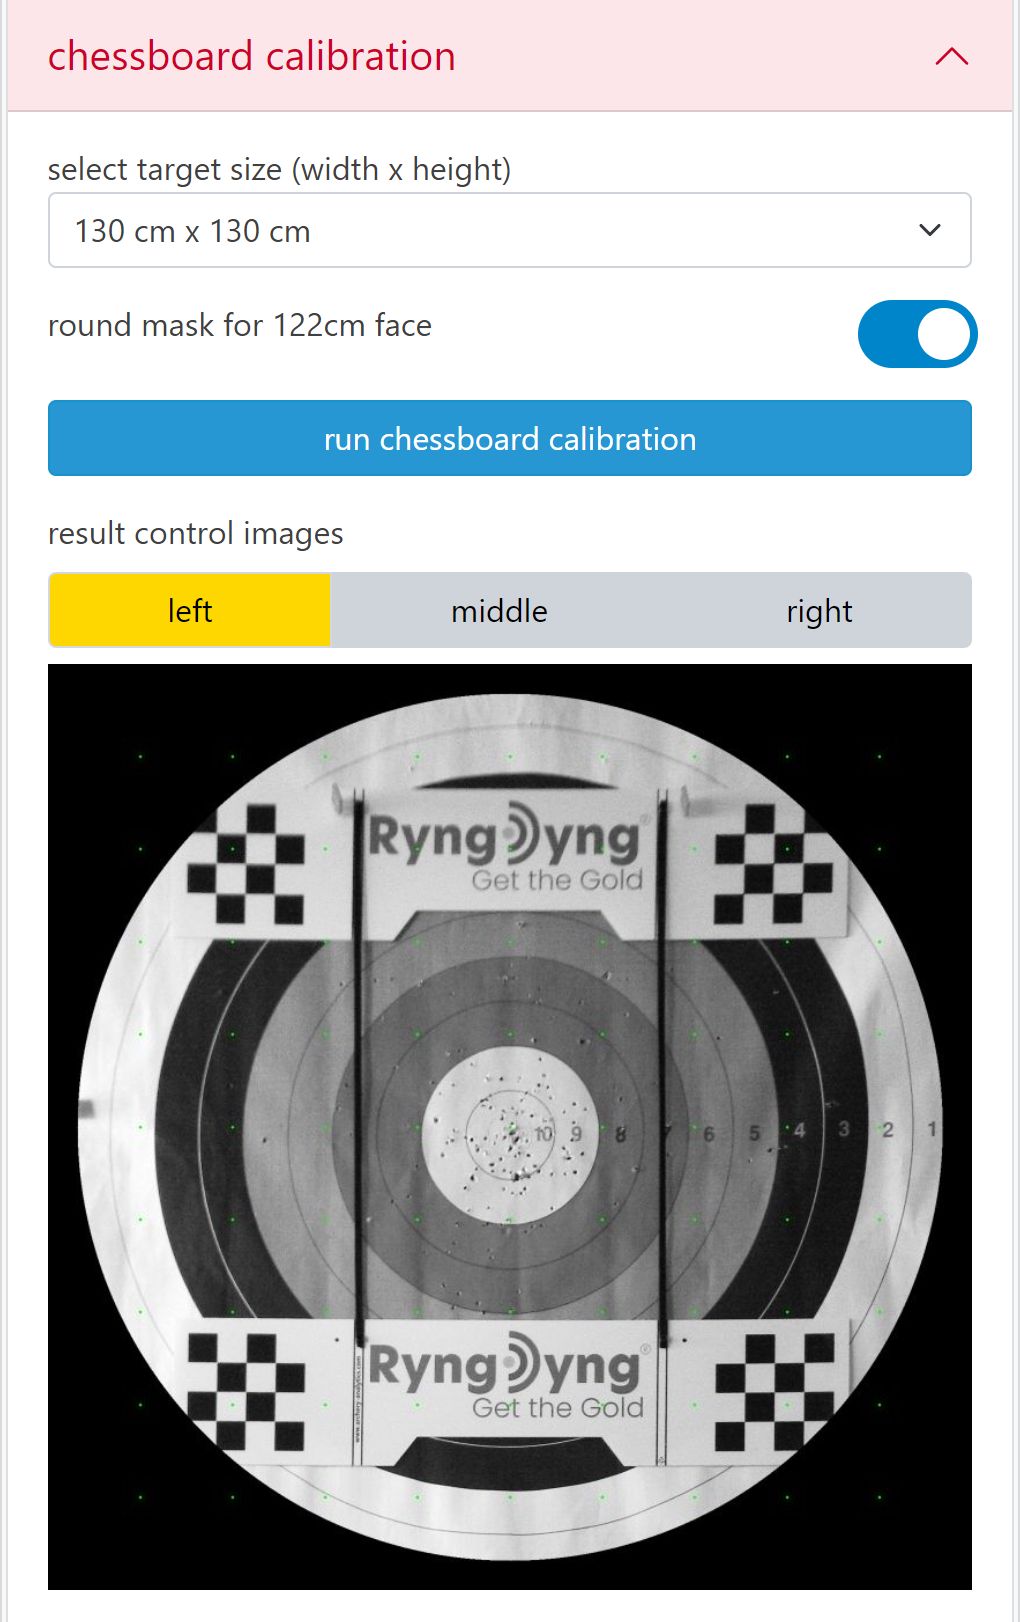
The round mask toggle should be activated when the target is round such as a Stramit disc. This will hide the background behind the round target in a rectangular image.
After the chessboard calibration, attach the faces to the target and switch to the target recognition section.
RyngDyng RD720 can monitor up to 4 faces simultaneously (RD600: 2 faces). RyngDyng automatically recognizes the type of face used and assigns the letters A-D, which are common in competition, to all faces.
In addition to the standard WA faces with the colors yellow - red - blue, WA and NFAA field faces are recognized. Training with a beer mat as a target marking or with a blank target is also possible. However, arrows with a black shaft are only reliably recognized if the background is not also black. Possibly a light background can be created by attaching a turned 122 face.
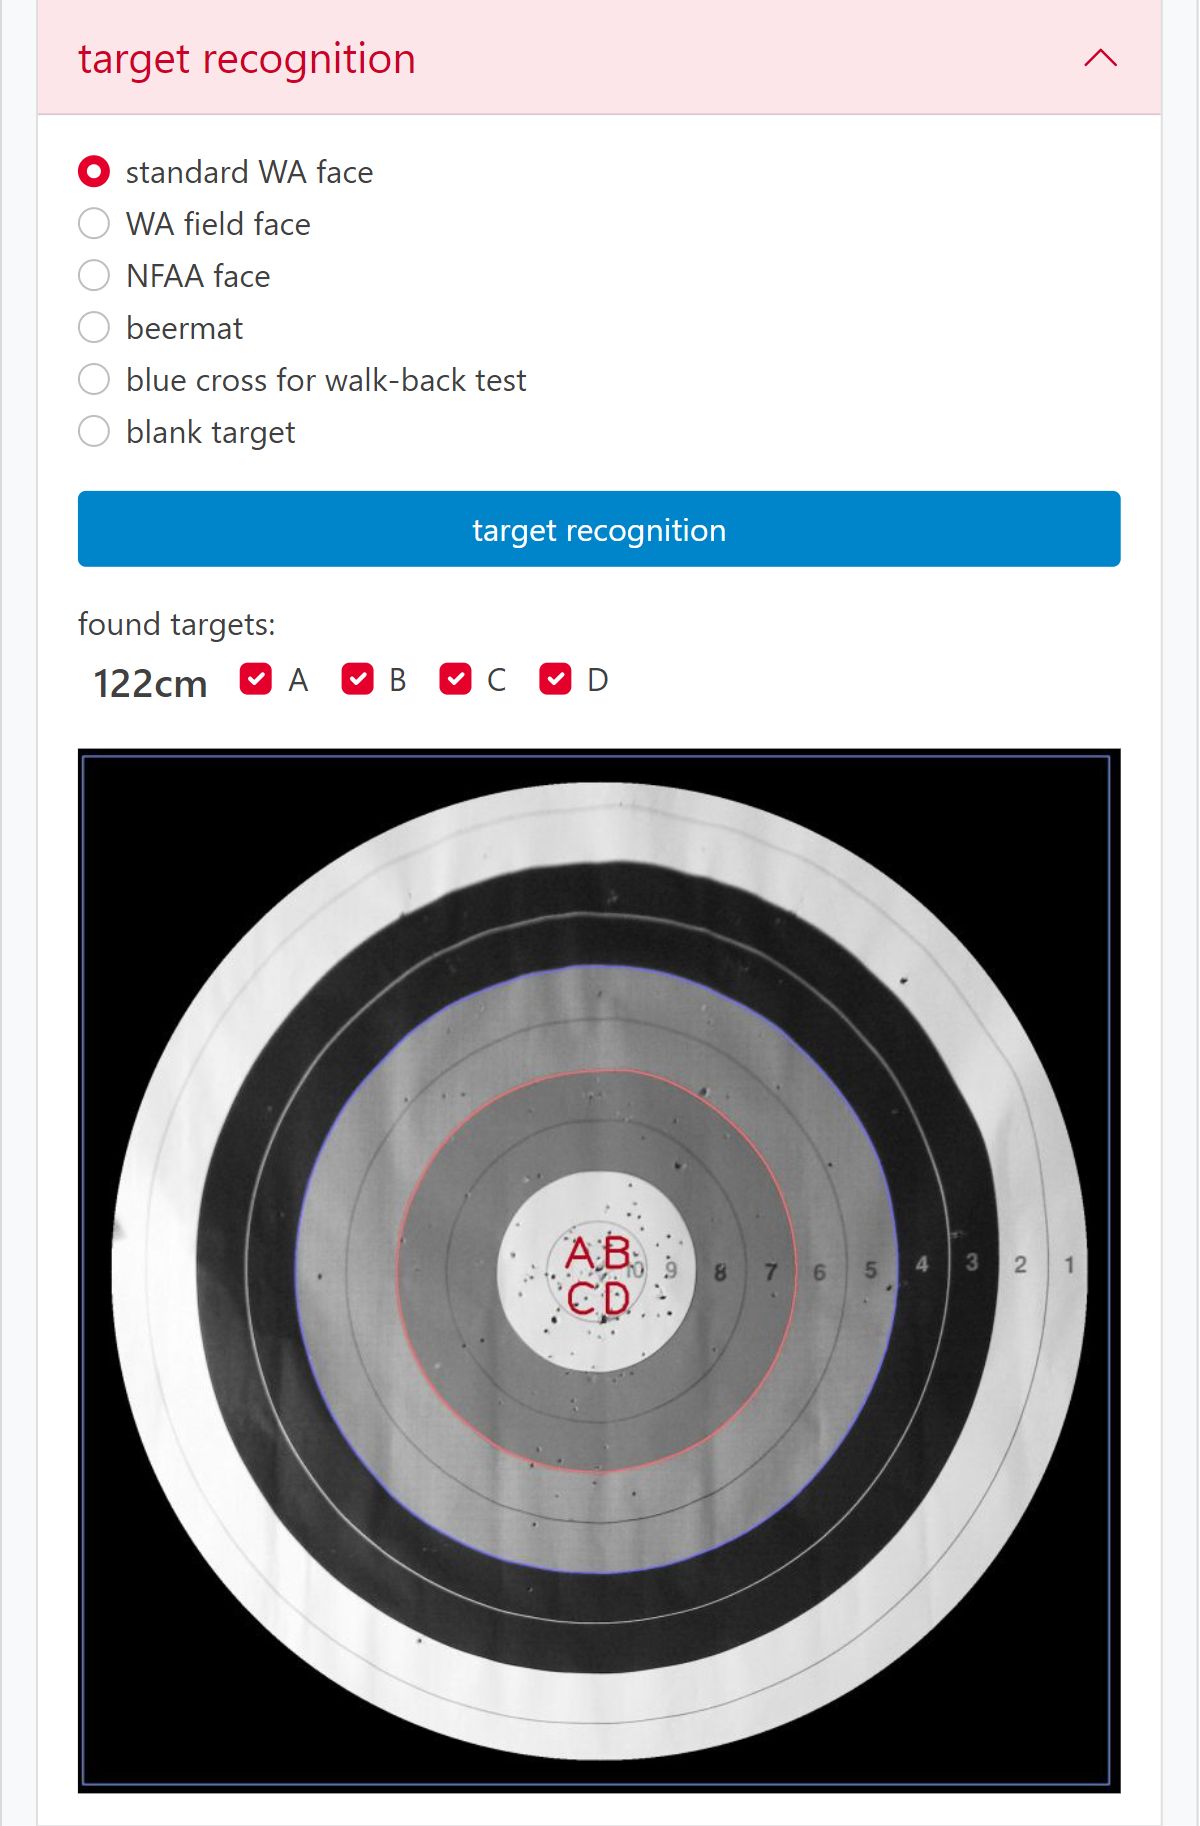
You can change the assigned letters by checking or unchecking the box. For example, you could give two 3 spots both the letter A. All arrows that are then shot at these two spots are then treated in the live display as if they were all shot at a single spot A.
You can check the quality of the calibration at any time in the quality checks section. The left image shows the quality of the chessboard calibration and the faces' positions. After the start of the arrow detection, there is information about the quality of the ring calibration and a control image (right image).

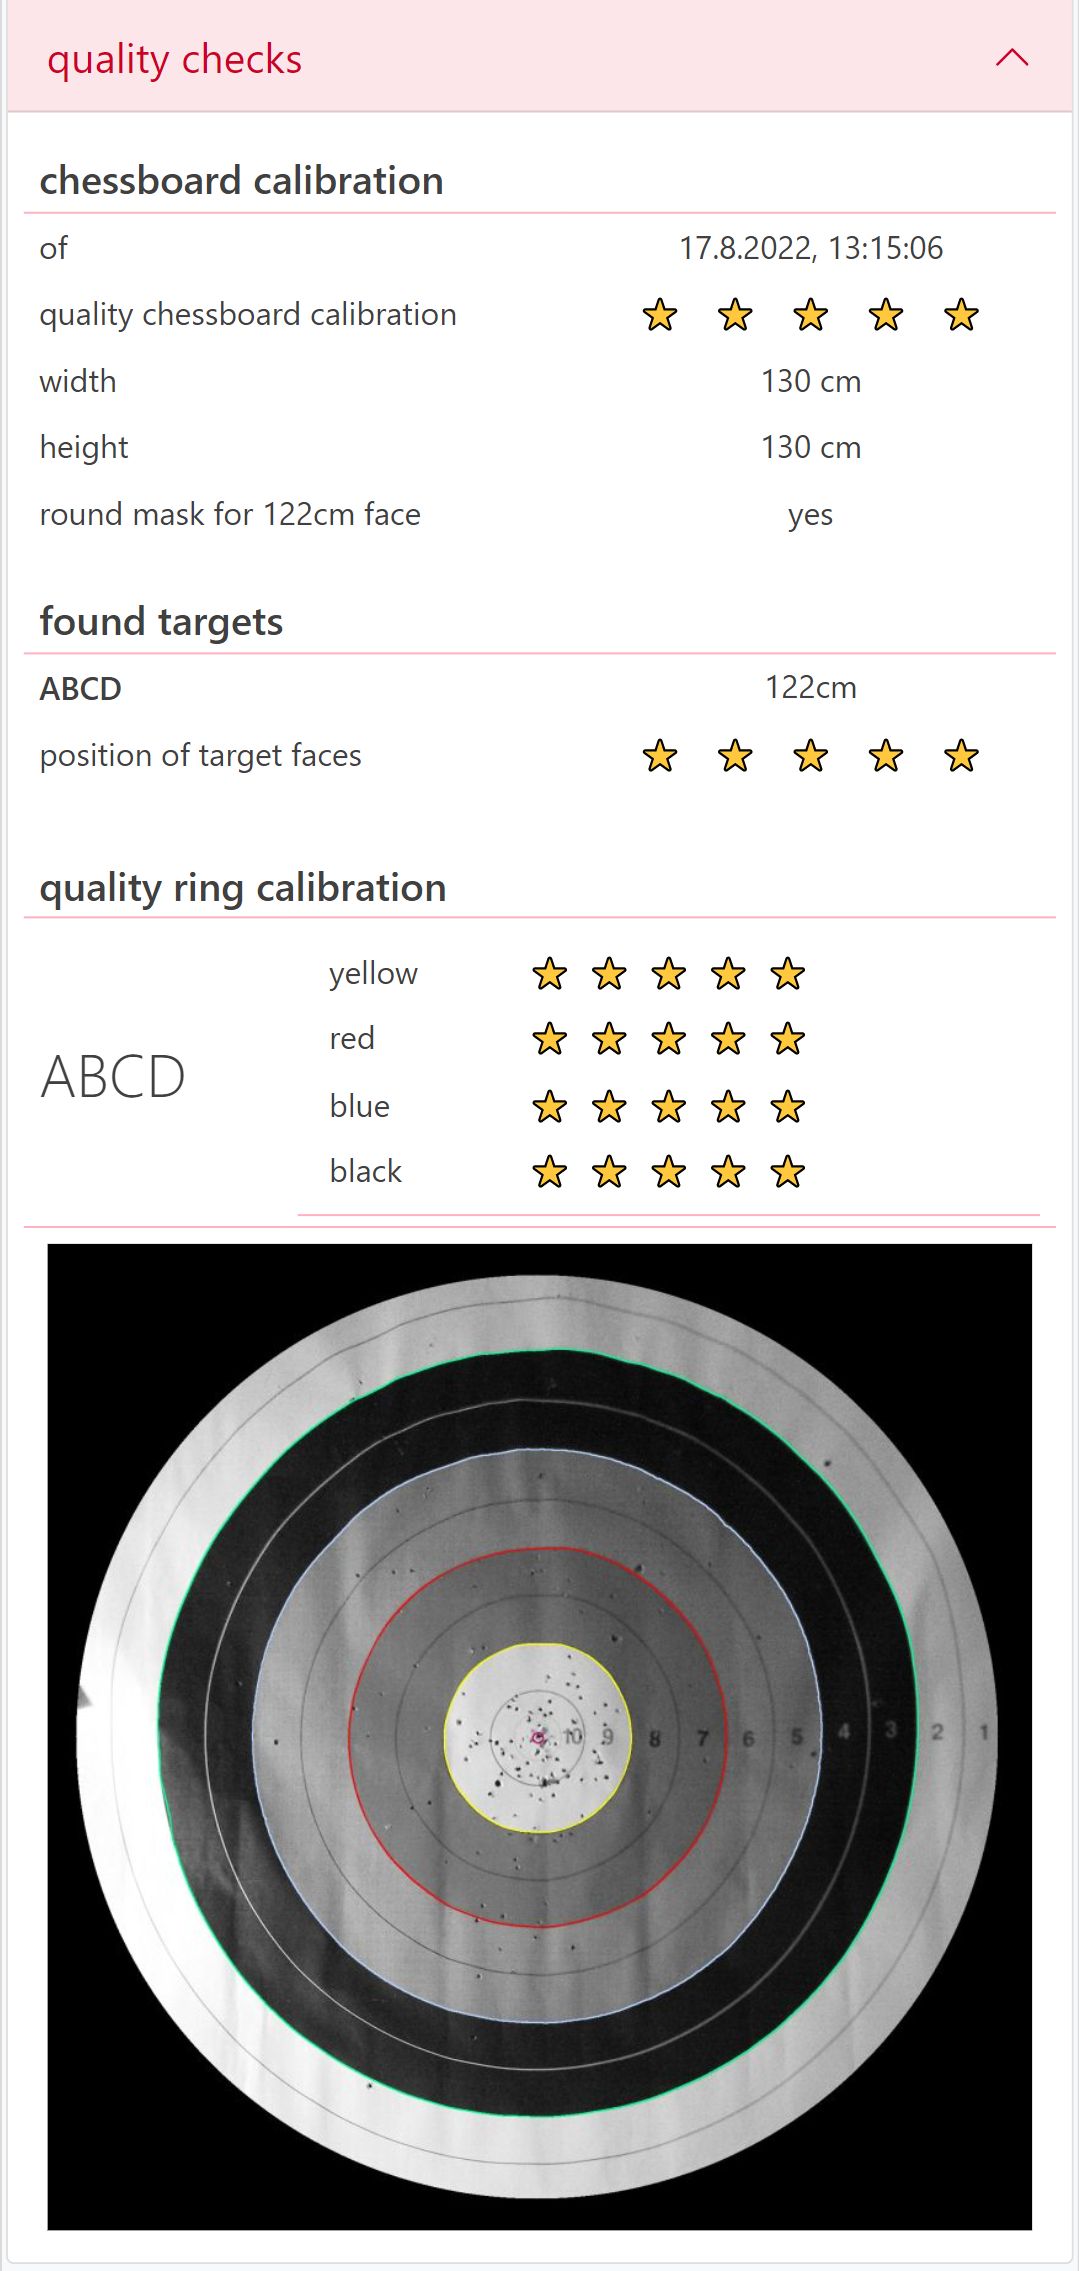
If the position of RyngDyng or the target shifts, this becomes visible in a reduction in the quality of the chessboard calibration. In this case it is important to put the RyngDyng case and/or the target back exactly in the original position. If this is not successful, the chessboard calibration must be repeated.
If you change the target face and put the new face back in the same position, the quality of the position of the overlays will not decrease. However, if the new position deviates from the previous one, this is reflected in a reduced quality of the position. In the event of poor positional accuracy, the target face recognition step should be carried out again.
Important note: The quality characteristics are measured and updated each time arrow detection is started. So you should always take a look at these quality features, especially after a change of faces.
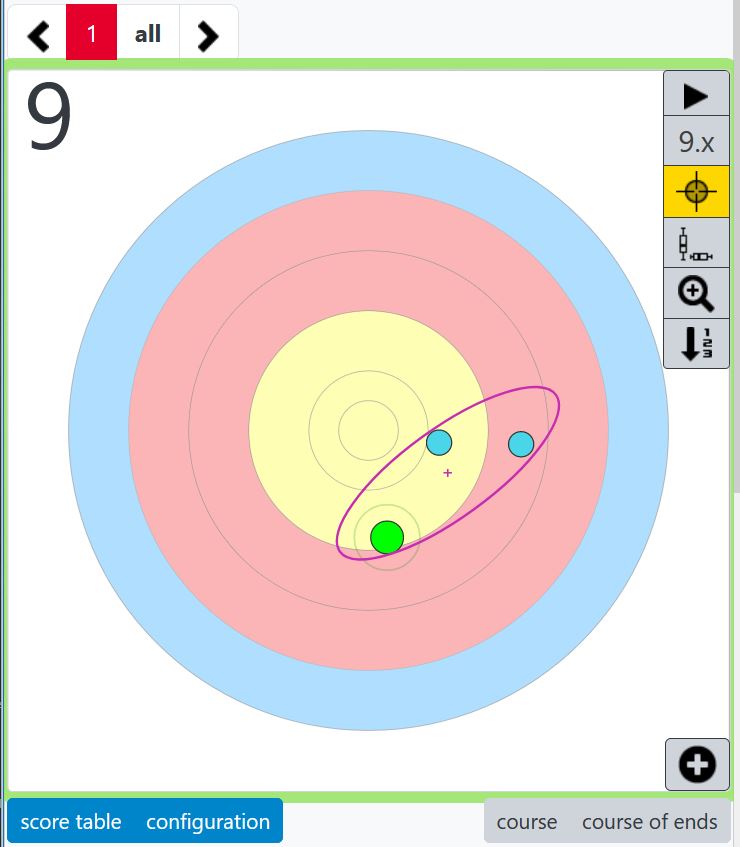
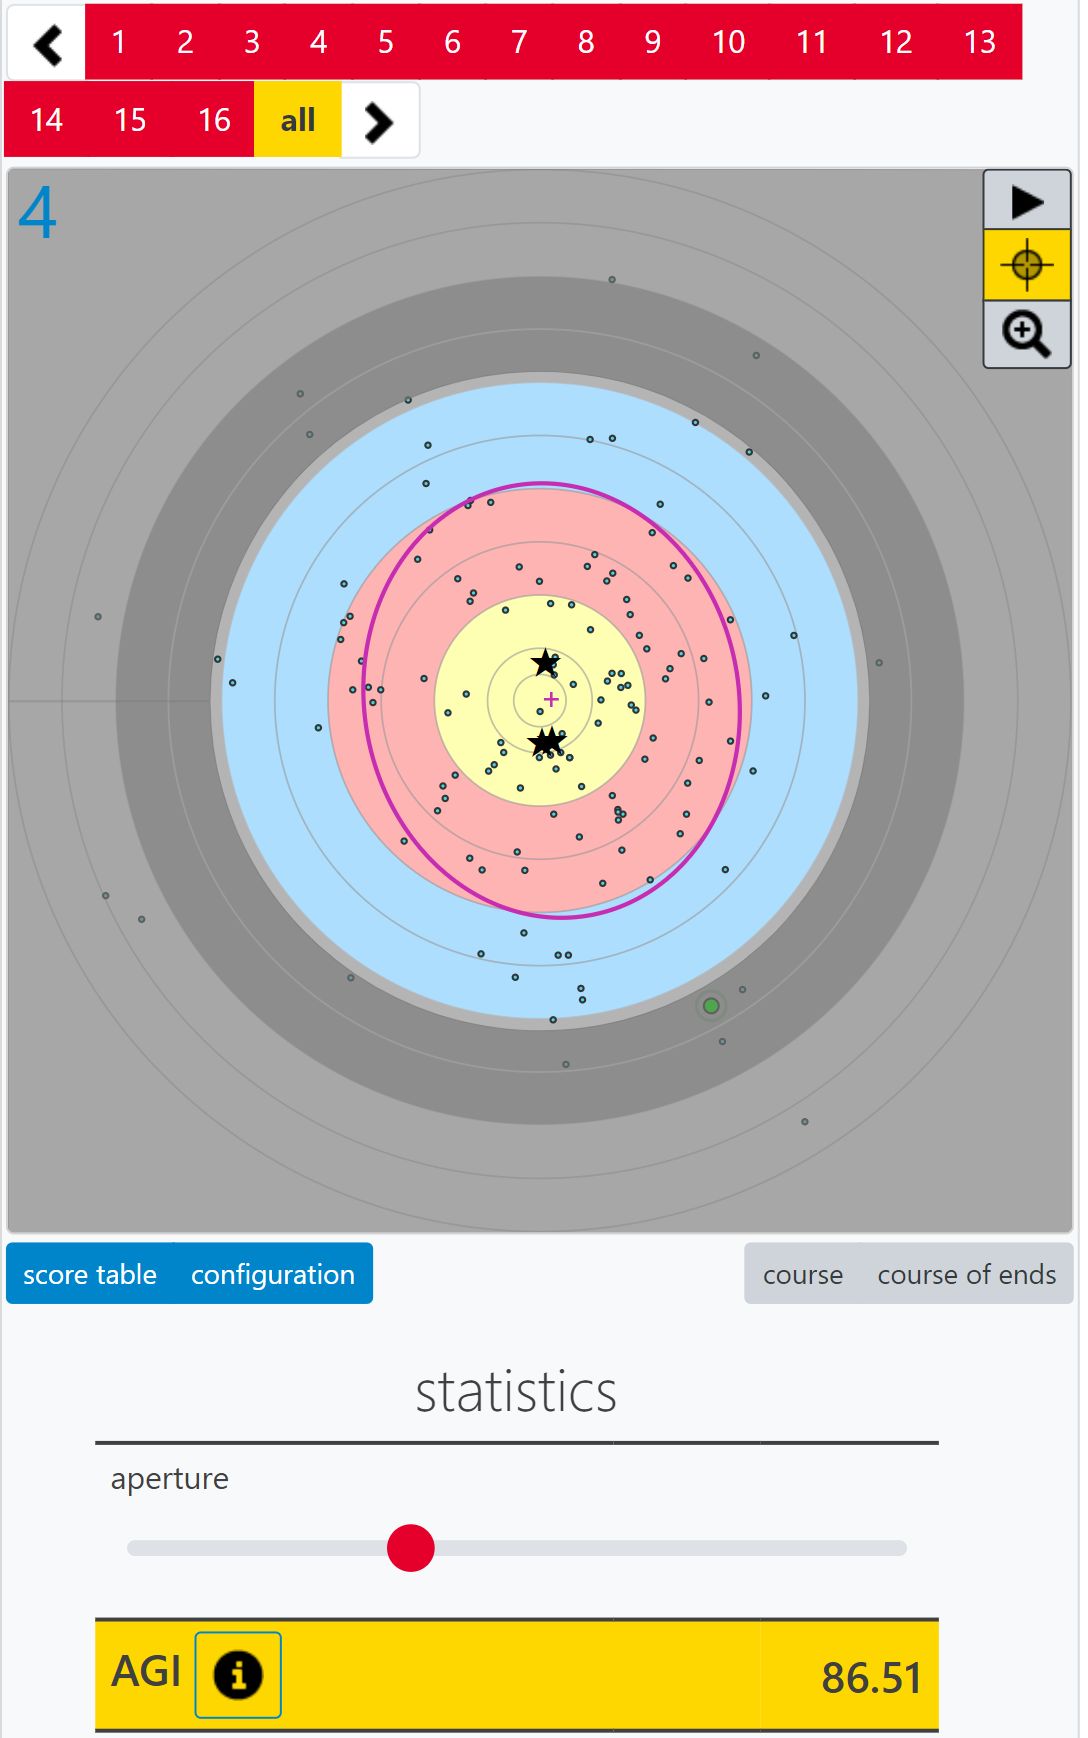
The most important view for actual operation is the hits page. Here you can start and stop the arrow detection and follow the arrival of all arrows live. The image on the left shows the view when the arrow detection is started. The right picture shows the measured position of 3 recognized hits by dots, the last hit is green and slightly larger. The diameter of the dots is the diameter of the arrow relative to the face size. If necessary, the zoom function can be used to enlarge it.
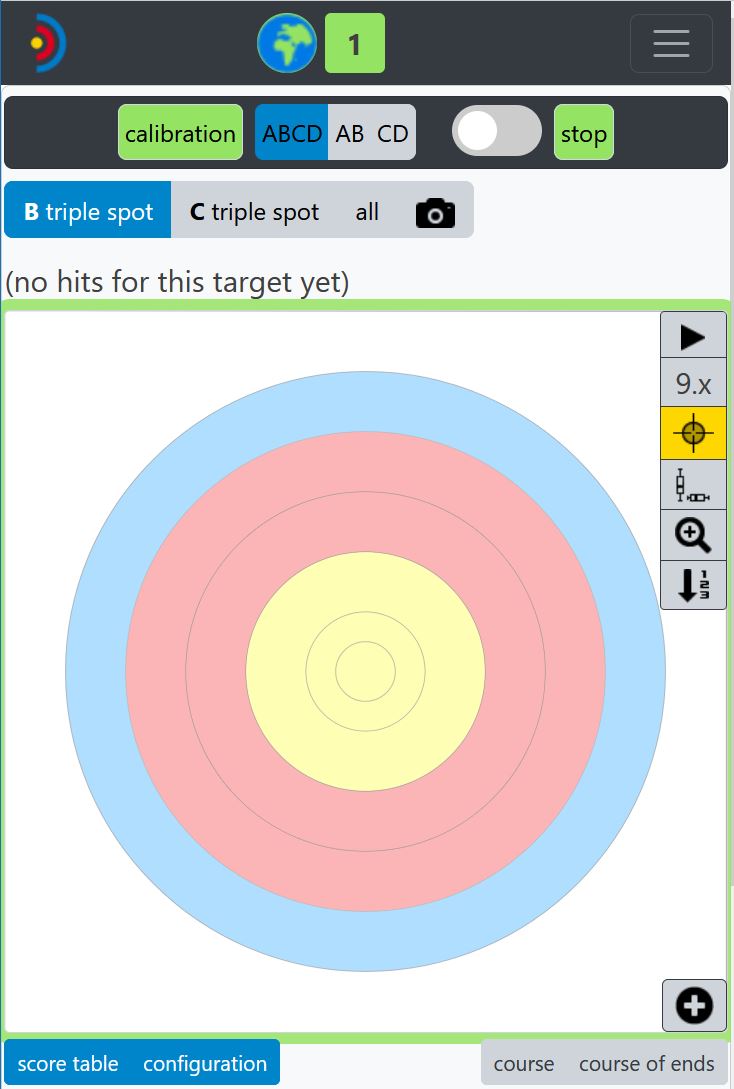
The individual areas have the following function:
- Calibration: green when fully calibrated (chessboard calibration + face recognition). Red if one step is missing. Clicking on this area takes you to the
calibrationpage (e.g. to check the quality) - ABCD, AB, CD: Switching like in competition. For example, if the left spot has the letters AC and the right spot has the letters BD, then all arrows are assigned to shooters A (left) and B (right) when AB is active.
- Toggle switch left to Start/Stop: activates the fast acquisition mode (fast mode). In fast mode, an initial measurement of the arrow's position is taken quickly (< 1 s for RD720) and a few seconds later an accurate measurement of the position is made. In this way you quickly have initial information and finally you still have a very precise position. An exact measurement is only possible when the arrow has come to rest.
- Start/Stop: Button to start and stop arrow detection.
- A/B/C/D: Switching the view between the faces (or, between the archers assigned to these faces)
- all: Overlaying all similar faces to one image
-
 : Live image from camera instead of drawn image (see image below)
 -
 : Playback of the arrow sequence through animation
 - 9.x: Show tenth of points
-
 : Show and hide the scatter ellipse. If there are several ends: switch to individual ellipses per end. For interpreting the scatter ellipses, see our
White paper Tuning and Data Analysis
: Show and hide the scatter ellipse. If there are several ends: switch to individual ellipses per end. For interpreting the scatter ellipses, see our
White paper Tuning and Data Analysis
-
 : Show distribution of hits using boxplots. On how to interpret boxplots, see our
White paper Tuning and Data Analysis
: Show distribution of hits using boxplots. On how to interpret boxplots, see our
White paper Tuning and Data Analysis
-
 : Enlargement of the section so that all arrows are displayed in maximum size. You can compine this mode with the aperture and focus on just the center of the target.
 -
 : In case of spot targets: switch between overlayed and singled display mode.
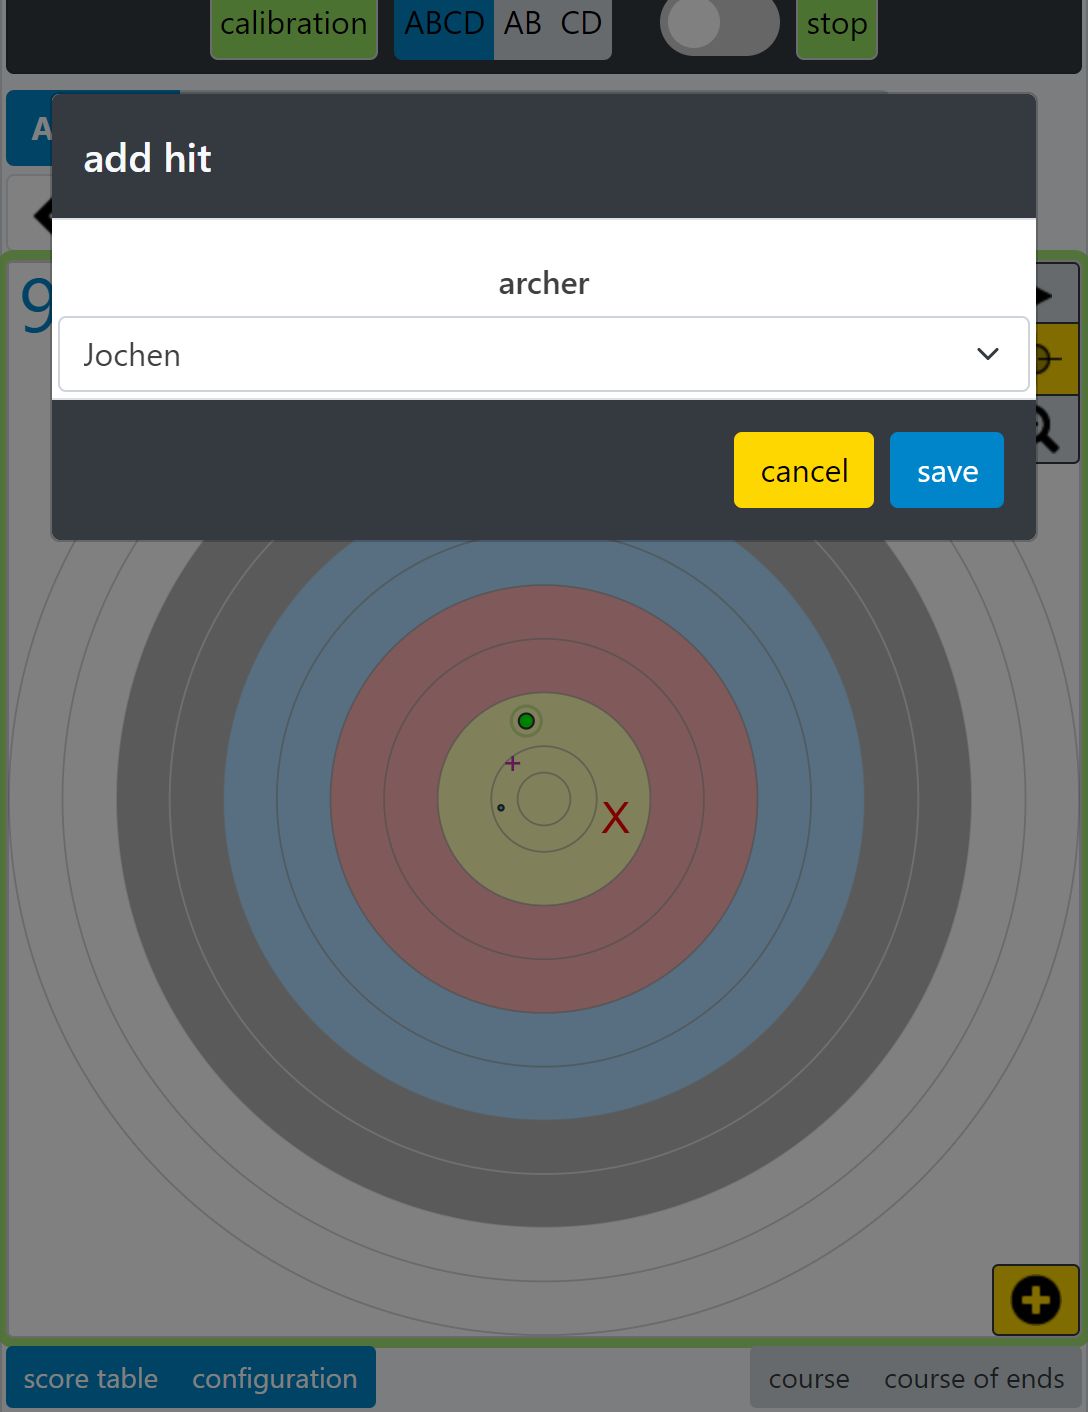
If you click on a displayed hit (enlargement with the magnifying glass can be helpful), you can edit the hit. You can change the number of points, assign an arrow number, mark the arrow as a bare shaft or delete it (left image). You can also manually add an arrow by first clicking on the plus symbol
 at the bottom right, then on the position of the face where this additional arrow should be entered (right image).

Below the display of the face, the current key figures are also displayed (left image below). All displayed hits are included in the calculation. If several ends are superimposed or if all ends are displayed at the same time, the statistical statements become very significant (e.g. the position of the center point of the arrow group or the Arrow Grouping Indicator AGI). Outliers can be removed from the key figures of the statistics using the slider for the aperture (picture on the right).

If all the information about the sight has been entered (see Configurations section), instructions for the sight adjustment will be calculated. These are displayed when you click on the
![]() icon.
icon.
If you use a tablet in landscape format, the statistics appear to the right of the face. So you have everything in view at the same time.
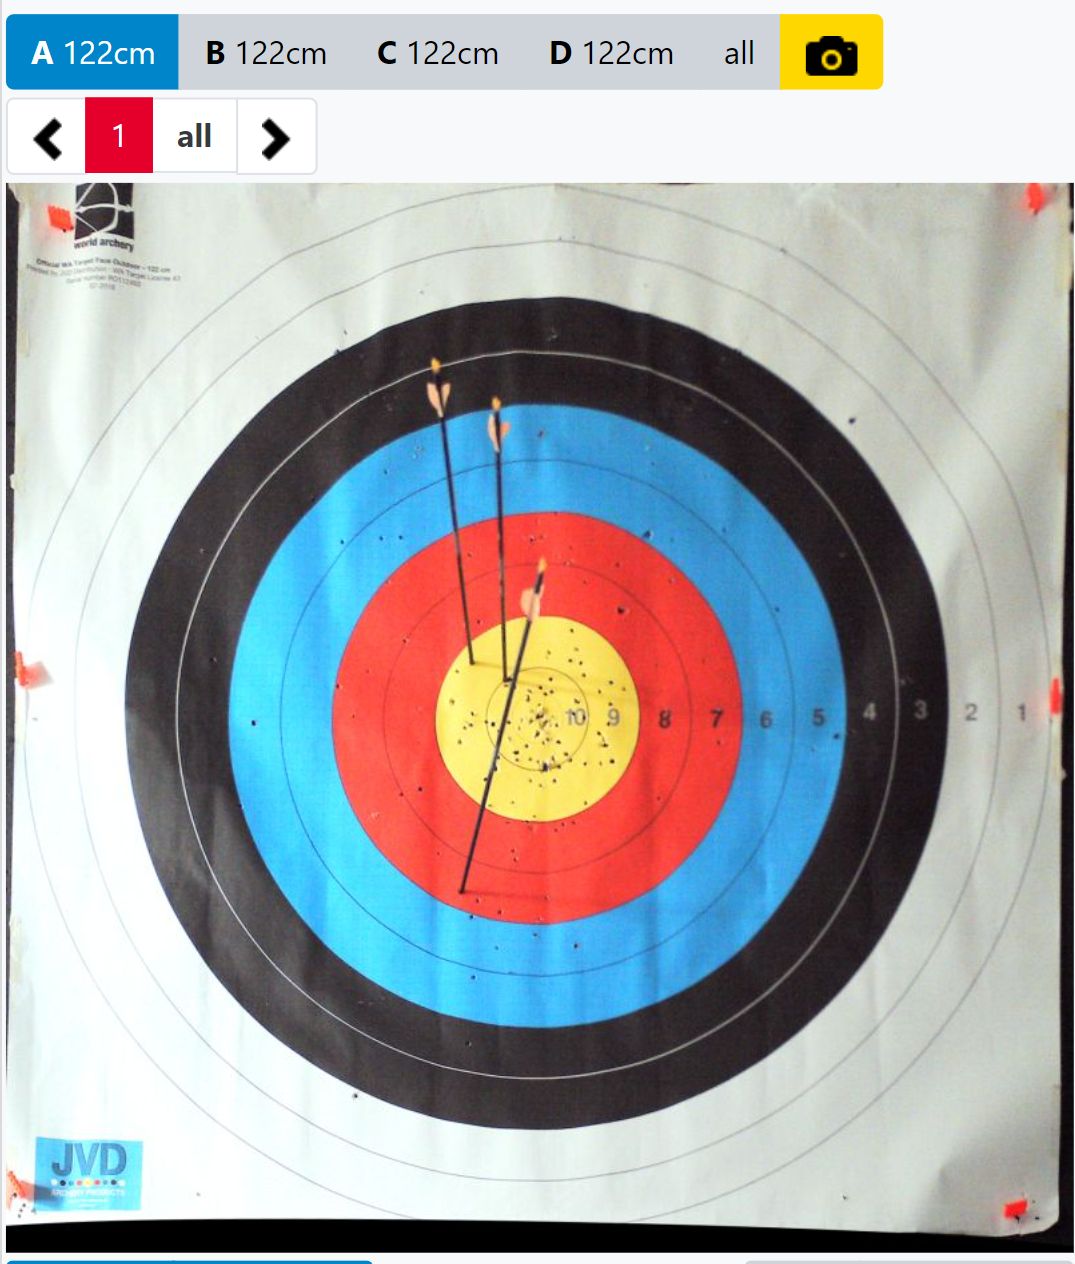
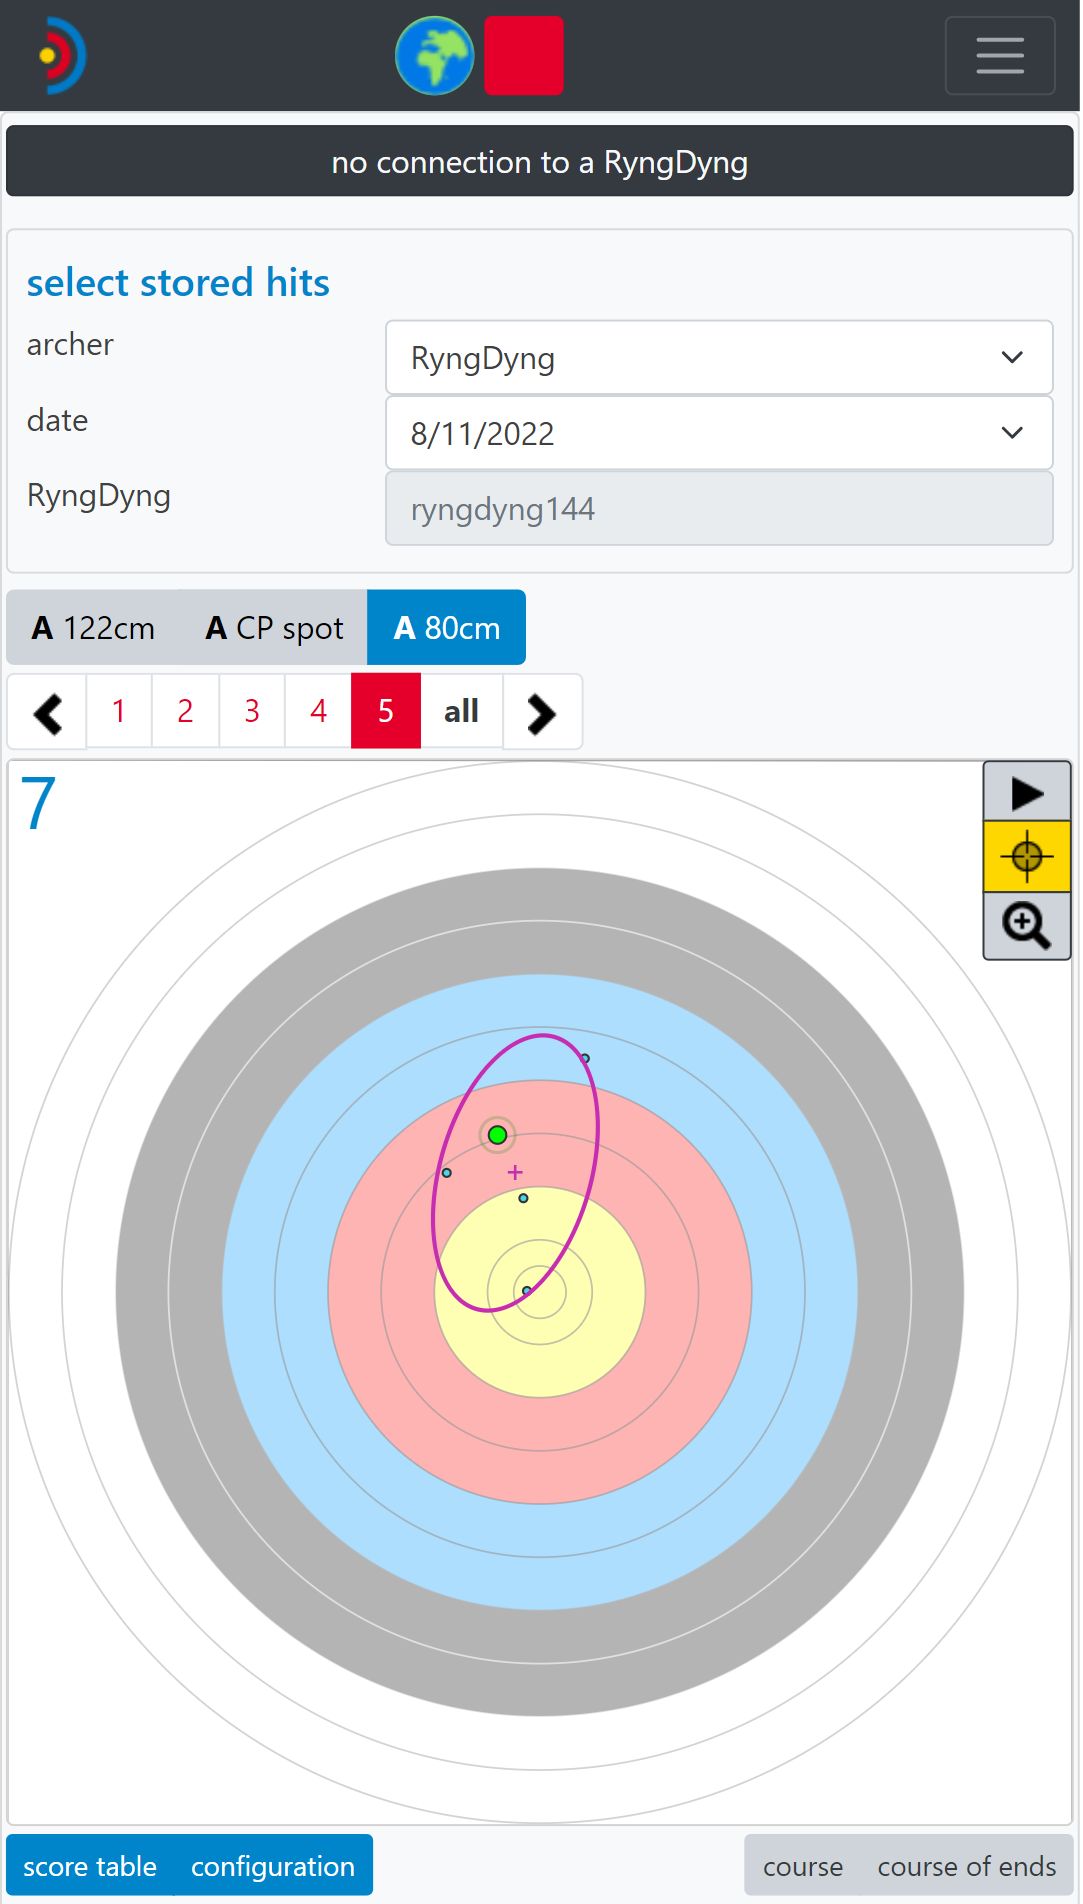
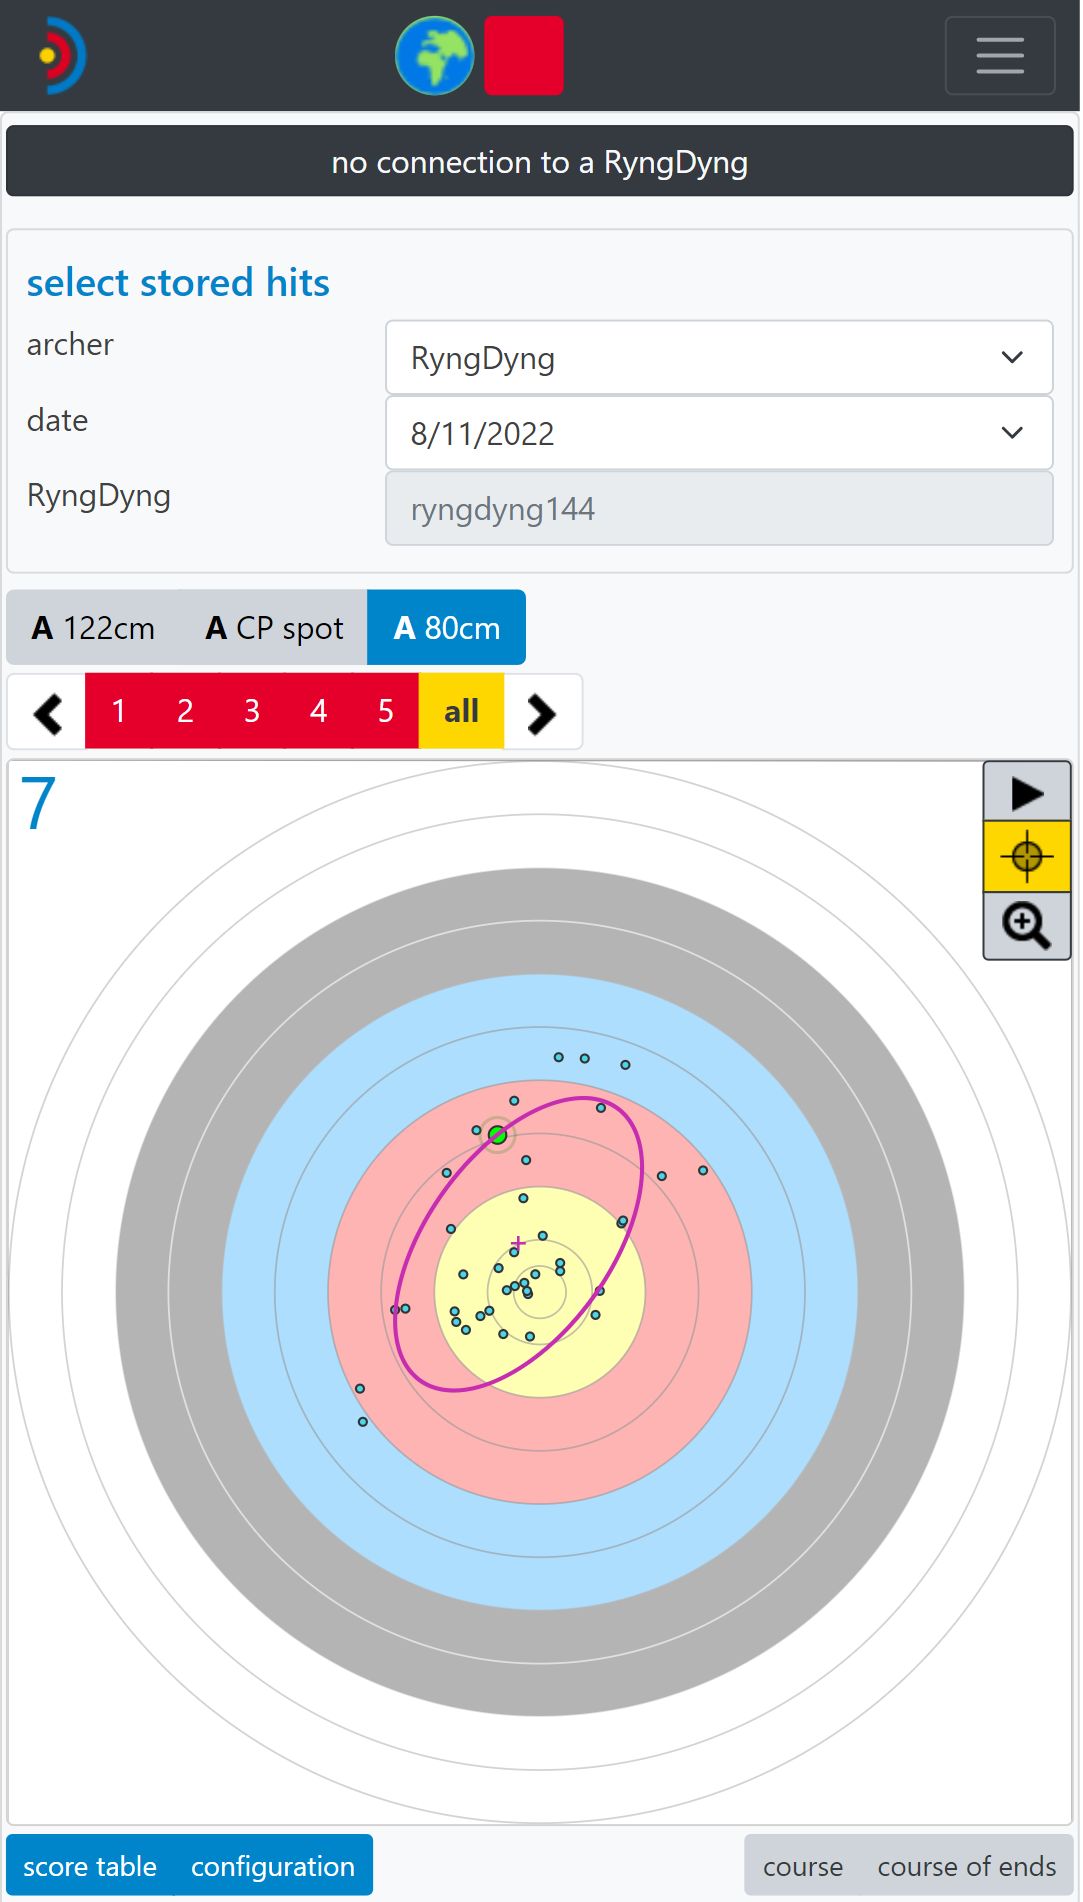
If there is no connection to a RyngDyng, the saved hits from the RyngDyng App database are displayed on the hits page.
Basically, the RyngDyng app saves all hits that belong to the archers added to the app. So you first select the person in question and then the day for which the hits should be analyzed. After the hits have been retrieved, you will see which faces were shot on the selected day and which ends were recorded.
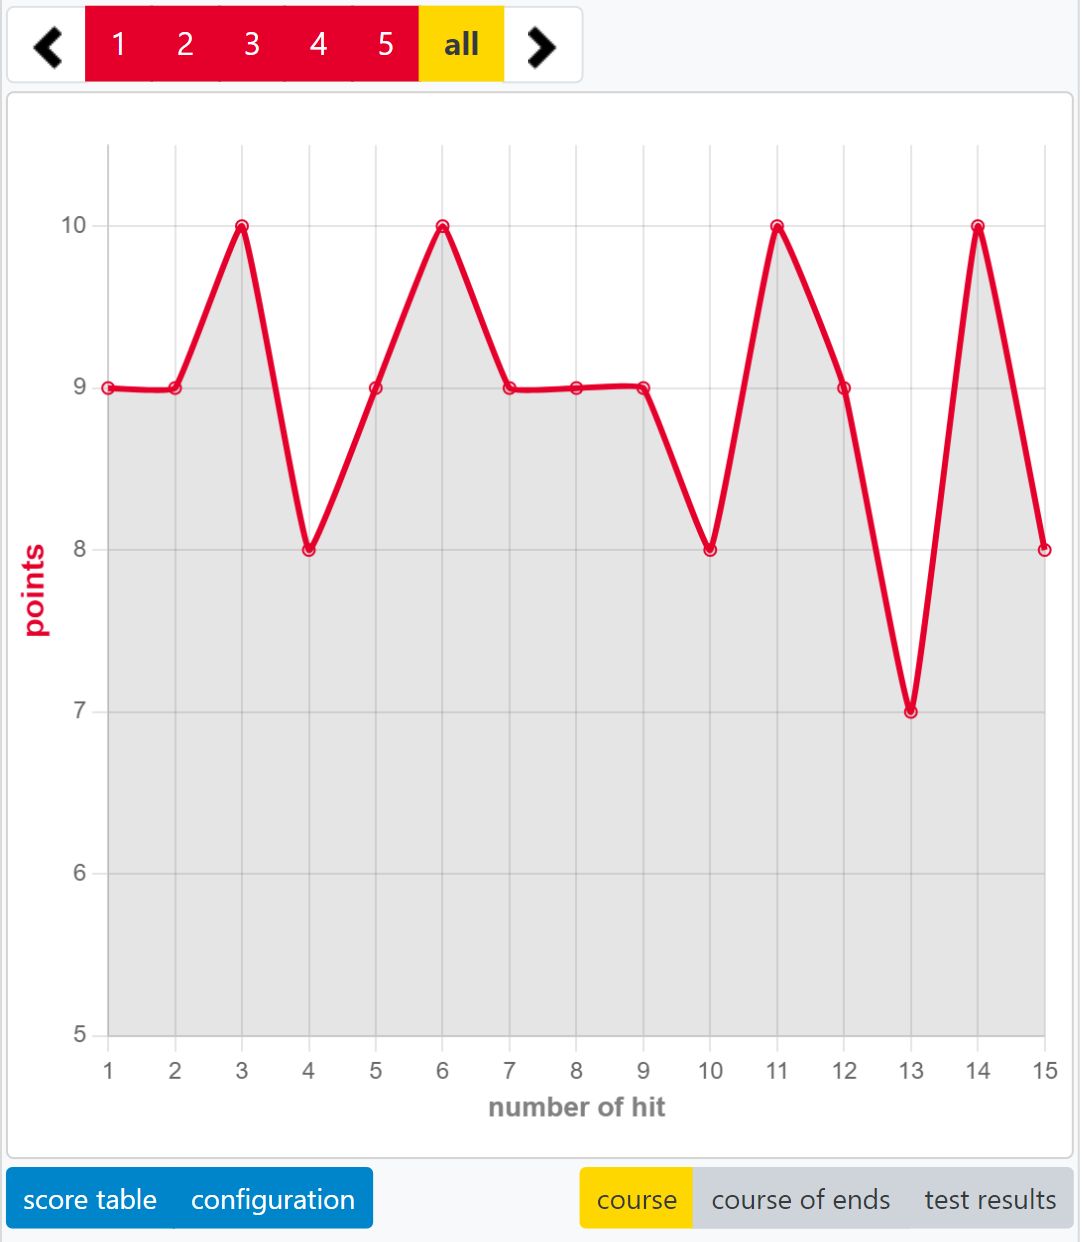
The displayed end is marked in red. If you click on more ends, they will be superimposed. The arrow keys move the selected ends left and right. All ends can be overlaid with the all button (right image).
The calculated key figures always refer to the hits shown or to the hits visible within the aperture.
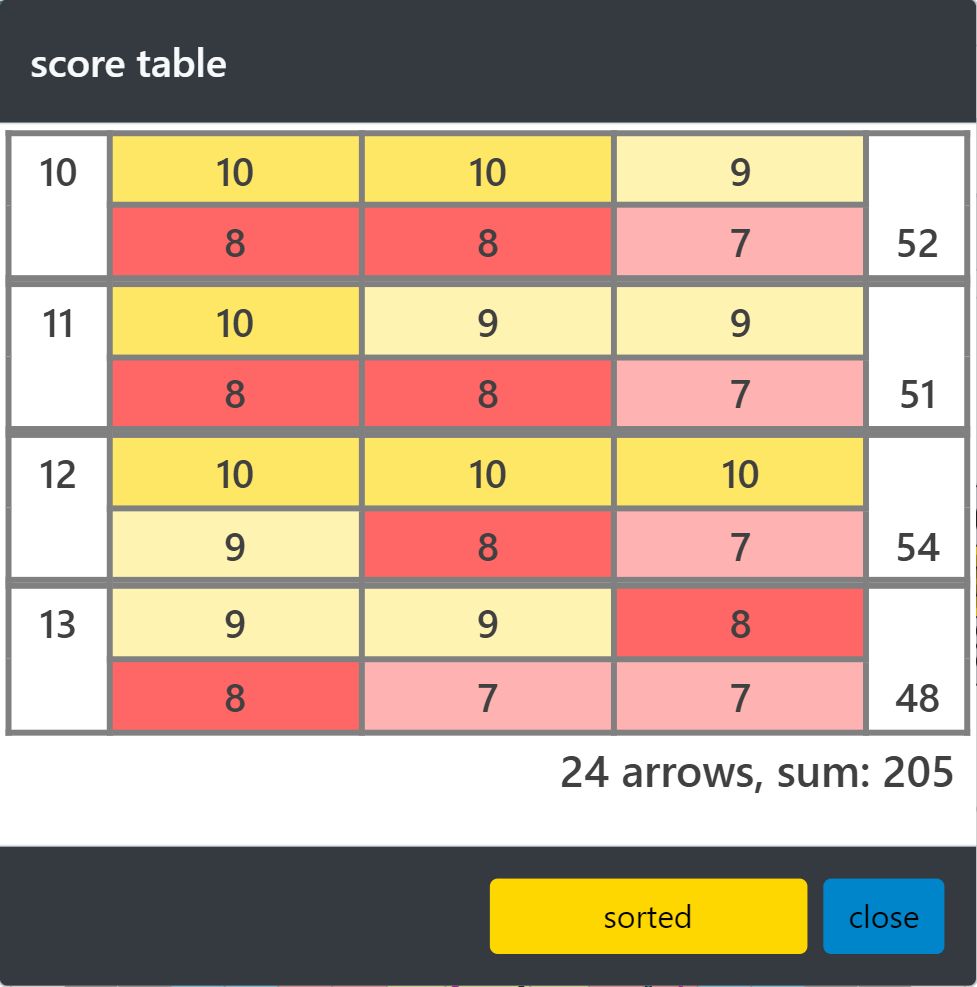
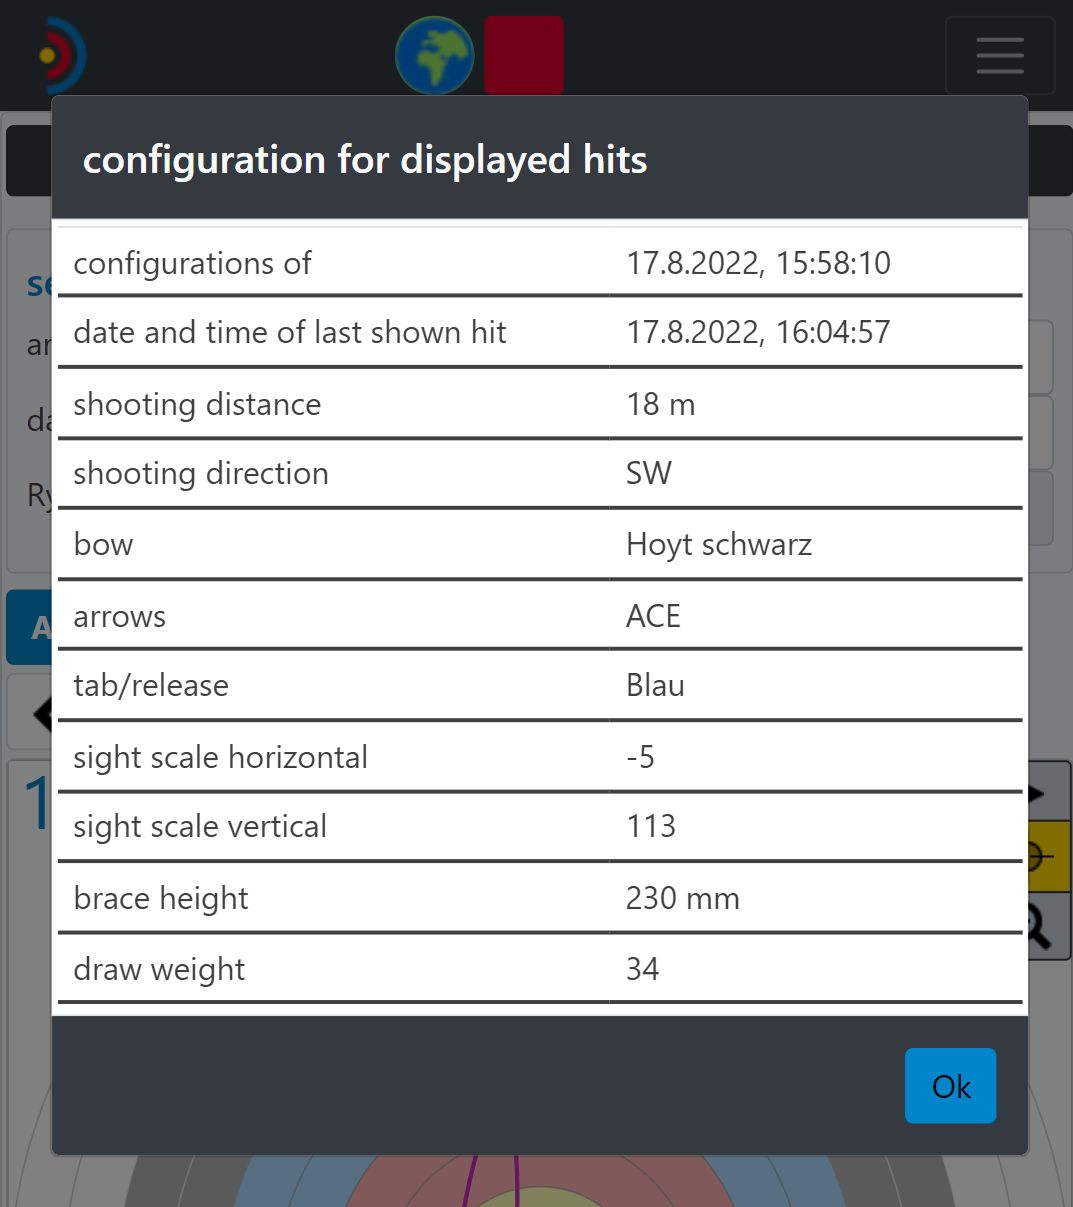
The hits shown can also be issued in the form of a traditional score table. To do this, click on the score table button (left image). The settings stored during the recording of the hits can be called up by clicking on the configuration button (right image).
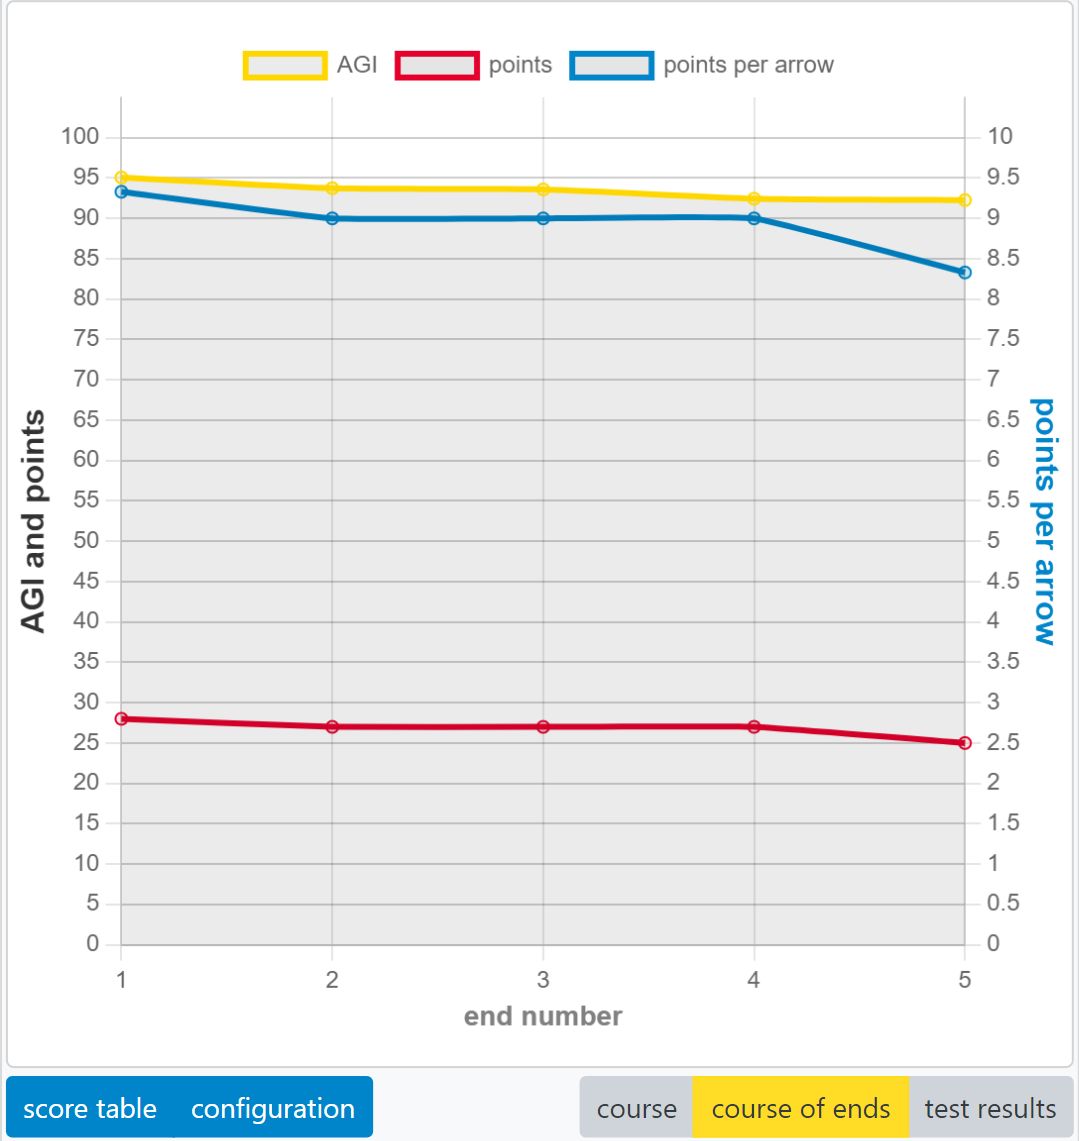
Evaluations of the course of the score numbers are visible with the button course (left image). The course of ends button generates the diagram with important key figures for the individual ends (picture on the right). Here you can see, for example, how your performance has changed over the course of a training day or a tournament.
The RyngDyng App supports the execution of grouping tests and the Berger test for tuning the bow settings, the arrows and for analyzing the shooting technique. The theoretical background to this is presented in our
White paper Tuning and Data Analysis
.
On the tuning page you can view previously recorded tests and also record new tests.
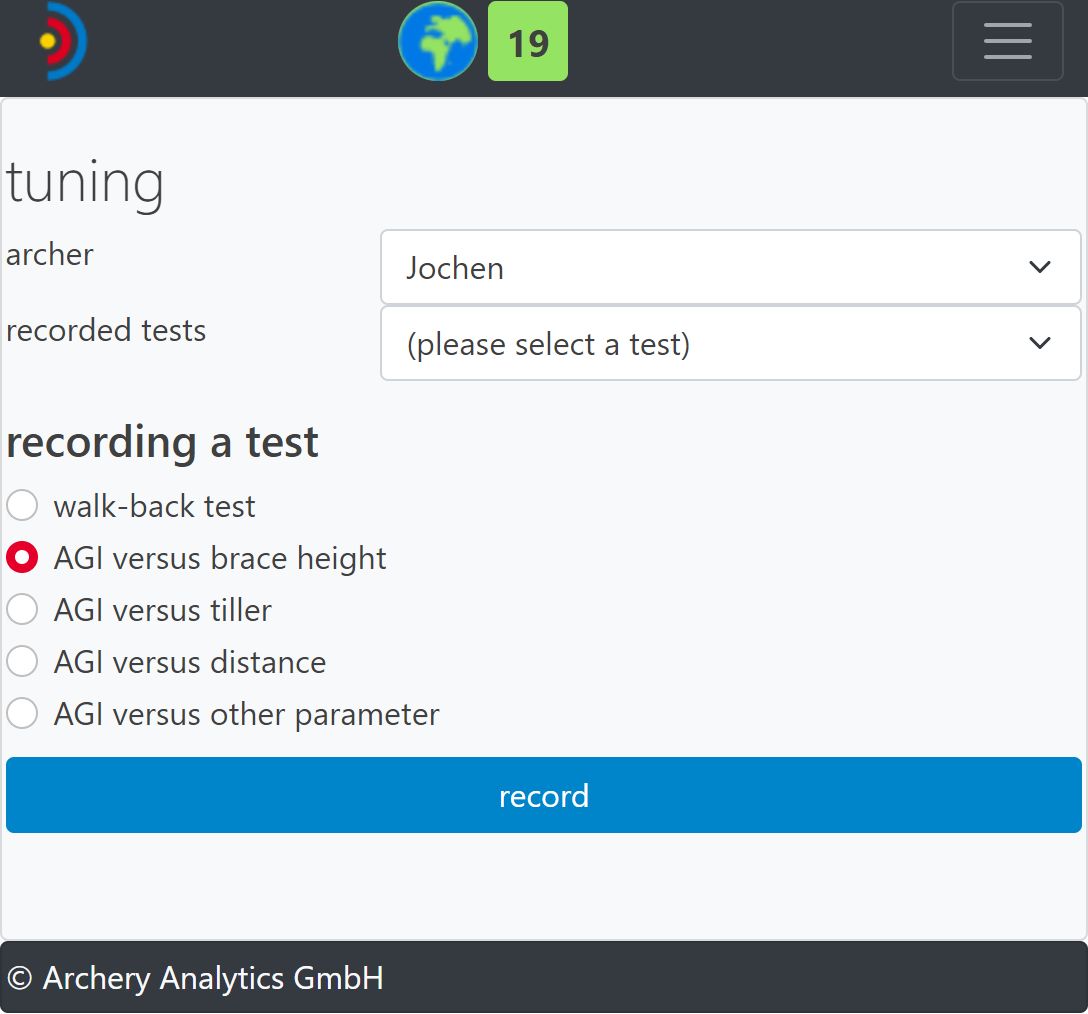
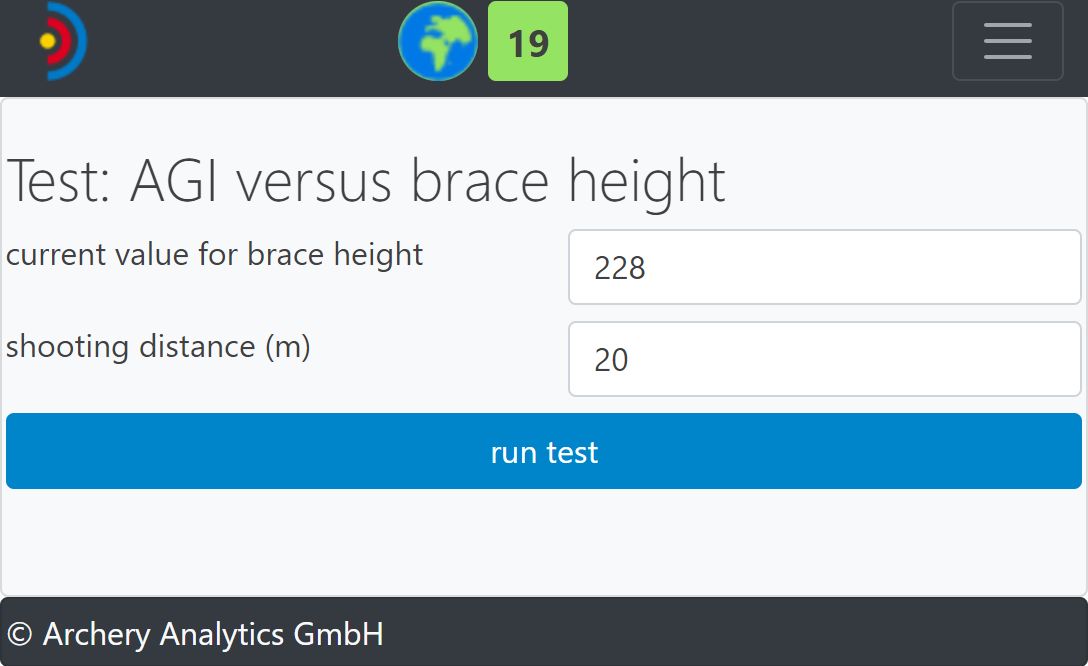
For example, if you select the test "AGI versus brace height" and click on record, you can first enter the starting value for the brace height and the shooting distance (left image). Then the test is started and any number of arrows is shot (picture on the right).
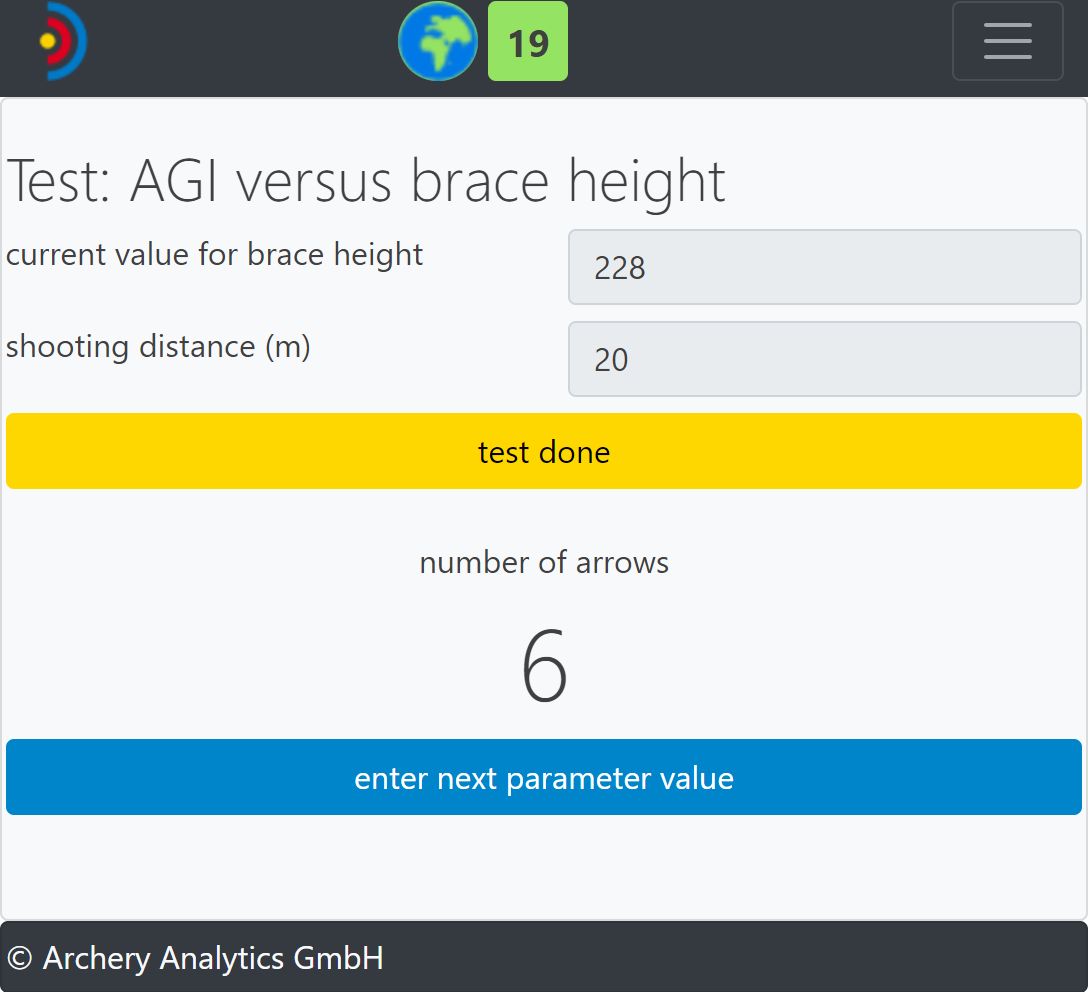
After each end you change the brace height, enter the new value and shoot a number of arrows again. During shooting you can also switch to the hits page with the live view of the hits, but the test recording continues in the background. Once all values have been tested, the test can be ended (test done button).
The test is then recorded and the result can be selected in the selection menu above. In this example, testing the values 228, 230, and 232 returned the following test result:
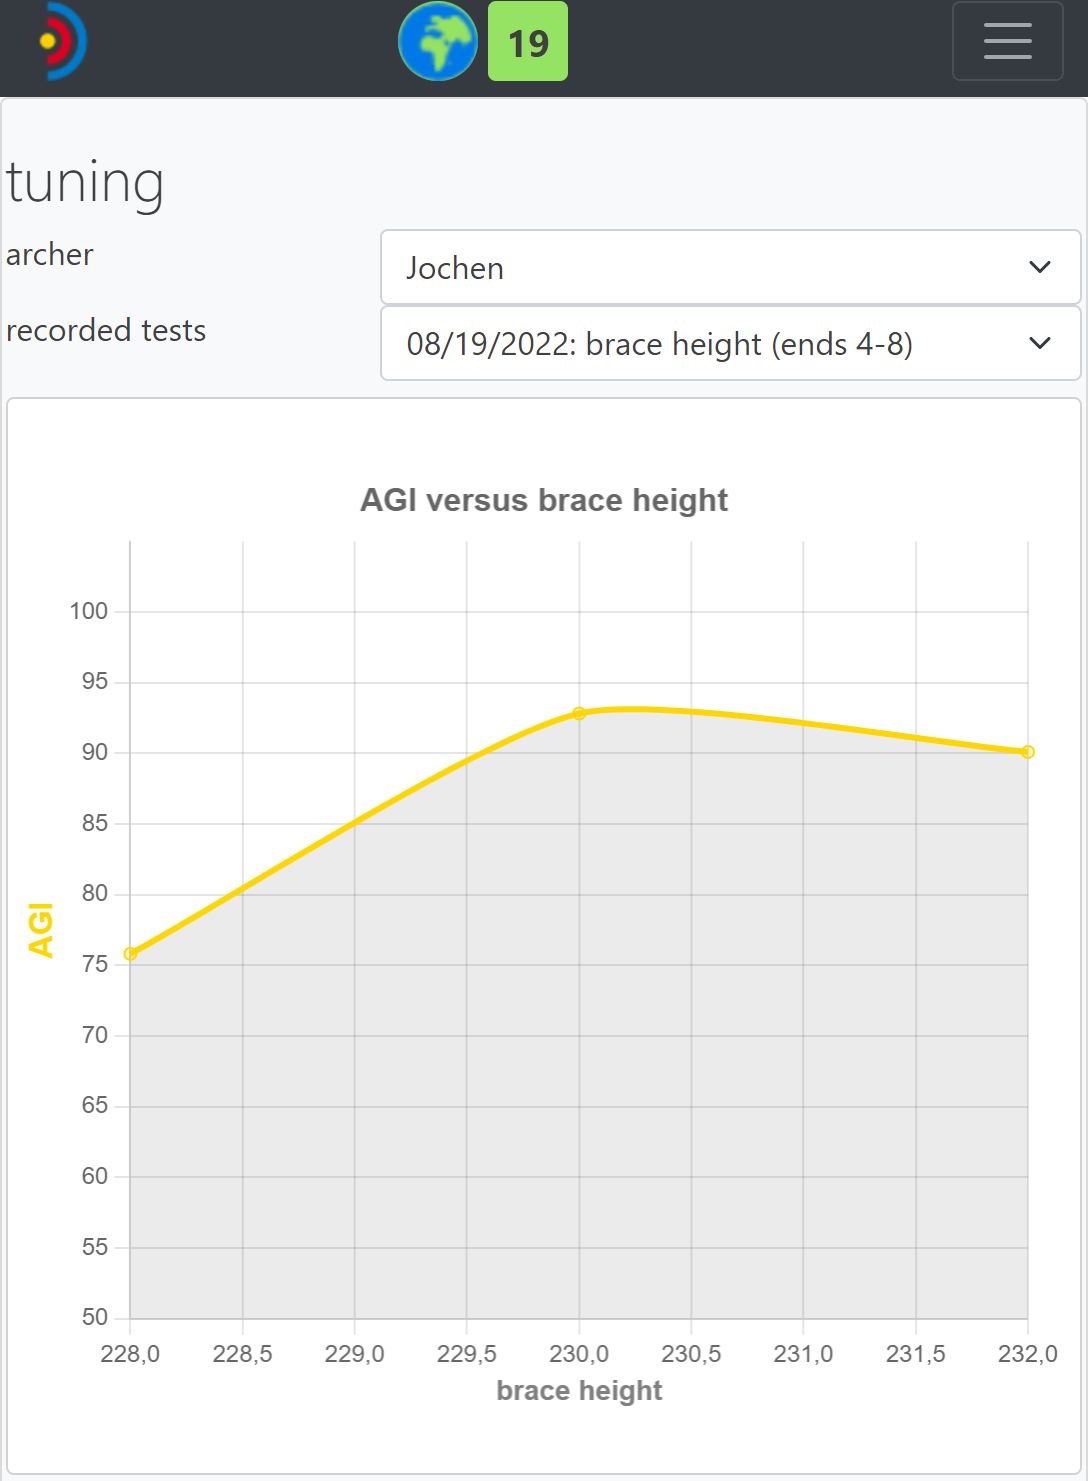
The brace height of 230 has reached the highest AGI value and thus the smallest group of arrows. This brace height is therefore optimal.
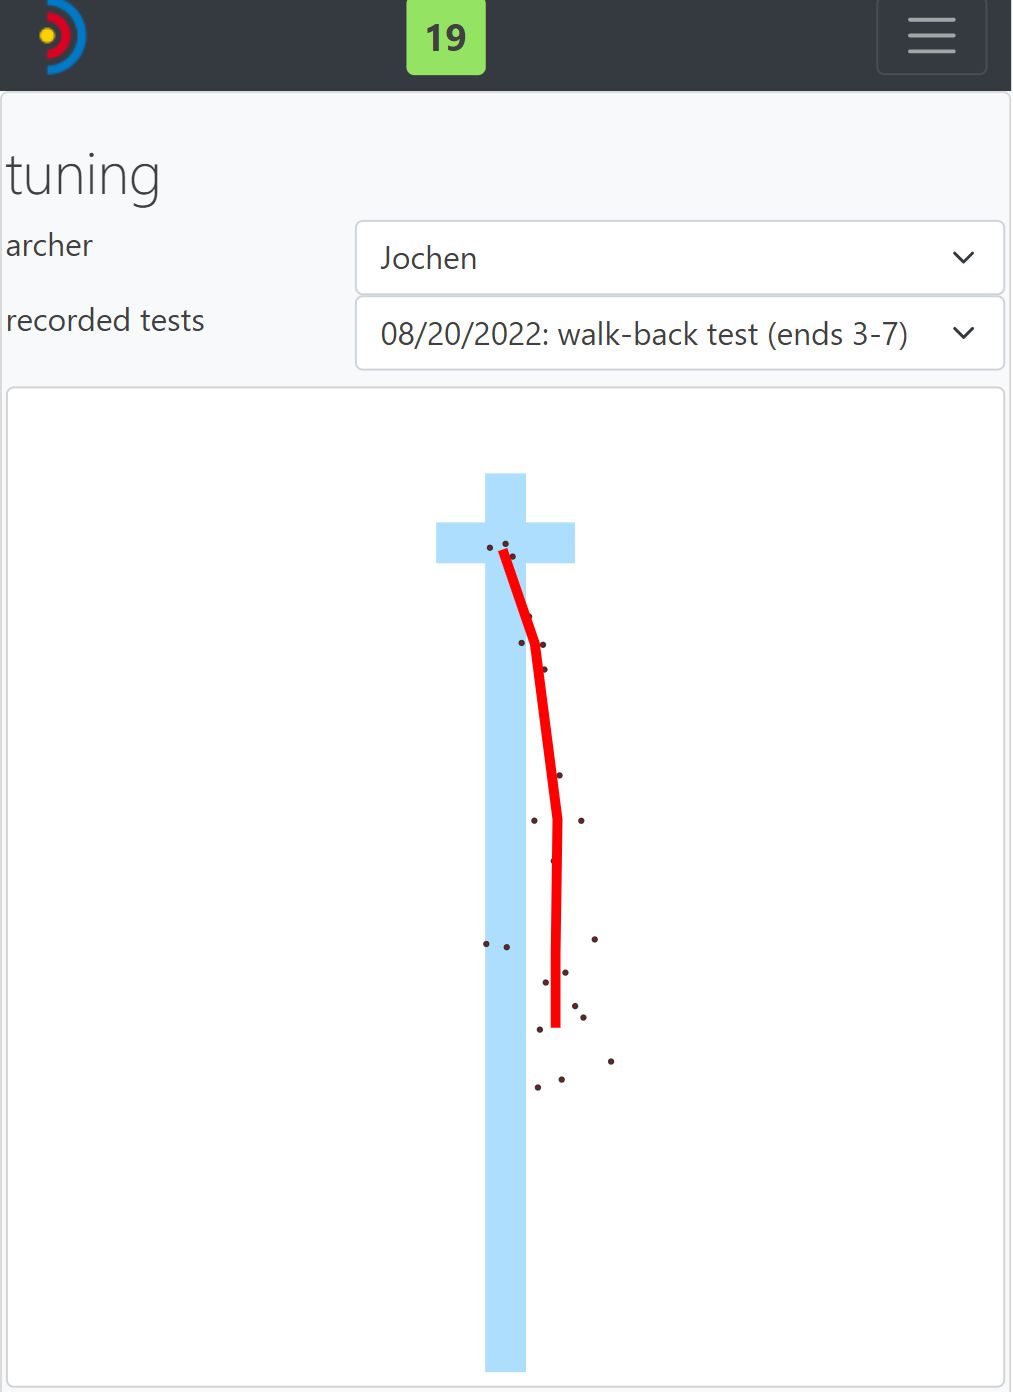
To carry out the Walk-back Test (Berger test) to optimize the setting of the plunger (button), you need the blue cross for the walk-back test, which can be downloaded
here
and then printed out. This should be placed on top of a light background such as a reversed 122 overlay and then recognized as an target face (calibration->Target recognition page). Then you select the walk-back test on the tuning page and start the recording.
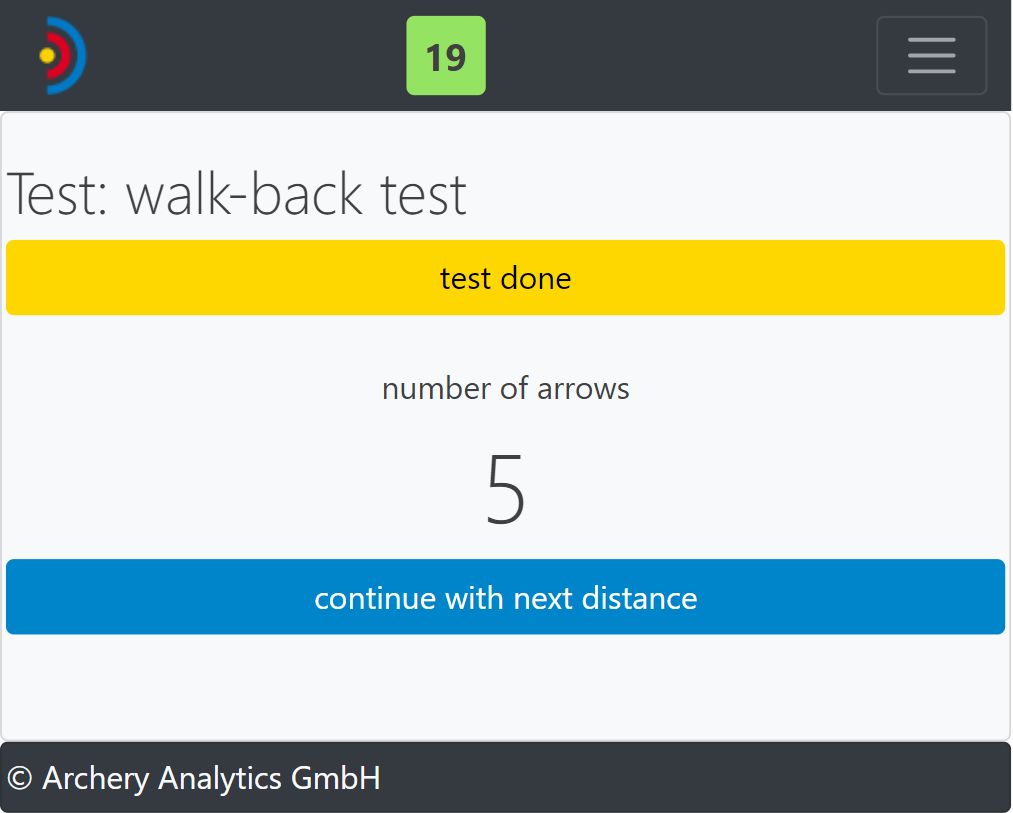
The test is conducted by setting the sight at a distance of approximately 5m and then shooting any number of arrows starting from that distance. Always aim for the middle of the cross. Then, increase the distance by 5 m and press the button continue with next distance (left image). This continues until the arrows hit the bottom edge of the target; then the test is terminated. The statistically calculated Berger line in red provides information about the changes that should be made to the plunger (right image). See our
White paper Tuning and Data Analysis
for more details.
Incidentally, all recorded tests are also synchronized with the server account and are also available there for retrieval and analysis.